
Security Configuration Guide
此内容尚不支持你的语言。
DHCP Snooping Configuration
Section titled “DHCP Snooping Configuration”Introduction
Section titled “Introduction”DHCP Snooping monitors DHCP-REQUEST and trusted port received DHCP-ACK messages, recording DHCP Snooping entries including client MAC addresses, assigned IP addresses, VLANs, and other information.
Explanation of Principles
Section titled “Explanation of Principles”Trusted Ports for DHCP Snooping
Section titled “Trusted Ports for DHCP Snooping”When DHCP Snooping is enabled, devices forward DHCP client’s DHCP request messages through trusted ports to legitimate DHCP servers, and the device generates Snooping Binding Table (SNP) entries based on the DHCP ACK response from the server.
DHCP Snooping categorizes ports into two security levels, and they are handled differently upon receiving DHCP messages:
- Trusted Ports: Trusted ports receiving DHCP ACK messages from DHCP servers generate SNP entries based on the contents of the messages.
- Untrusted Ports: Untrusted ports only forward DHCP ACK messages from DHCP servers and do not generate SNP entries.
DHCP Snooping Table
Section titled “DHCP Snooping Table”SNP entries contain information such as VLAN, MAC, IP, INTERFACE, etc. These entries are recorded by monitoring DHCP-ACK messages received through trusted ports. The entries are removed based on DHCP Release messages received on ports with DHCP Snooping enabled. Since the DHCP Snooping binding table records the correspondence between DHCP client IP addresses and MAC addresses, this information enables the following functionalities:
- Dynamic ARP Inspection (DAI): DAI uses DHCP Snooping entries to determine the legitimacy of the user sending ARP packets, thus preventing ARP attacks from unauthorized users.
- Source Address Validation Improvement (SAVI): SAVI uses DHCP Snooping entries to validate the legitimacy of users sending ND (Neighbor Discovery) packets, preventing ND attacks from unauthorized users.
- IP Source Guard (IPSG): IPSG filters IP packets on ports dynamically obtained from the DHCP Snooping table, preventing unauthorized packets from passing through those ports.
DHCP Snooping Configuration
Section titled “DHCP Snooping Configuration”| Configure Tasks | Instructions | Description |
|---|---|---|
| Enable DHCP Snooping | Required | |
| Configure port as trust state | Required |
Enabling DHCP Snooping Function
Section titled “Enabling DHCP Snooping Function”Enabling the DHCP Snooping function requires a two-step process: first, enabling the global DHCP Snooping functionality, and then enabling DHCP Snooping for specific interfaces or VLANs.
| Operation | Command | Description |
|---|---|---|
| Enter the system configuration view | configure terminal | |
| Enable DHCP Snooping | dhcp snooping enable{v4|v6} | |
| Enter the corresponding view | Interface View interface ethernet interface-id VLAN View vlan ID | |
| Enable DHCP Snooping | dhcp-snooping enable |
Configuring Ports as Trusted
Section titled “Configuring Ports as Trusted”To ensure that the device generates SNP entries only for DHCP ACK packets received from legitimate DHCP servers, you need to set the interfaces connected directly or indirectly to trusted DHCP servers as trusted interfaces. Other interfaces should be set as untrusted interfaces. This guarantees that, after enabling the respective security features, only terminals that obtain IP addresses from legitimate DHCP servers can access the network, preventing unauthorized access from self-deployed DHCP servers.
| Operation | Command | Description |
|---|---|---|
| Enter the system configuration view | configure terminal | |
| Enter the corresponding view | Interface View interface ethernet interface-id VLAN View vlan ID | |
| Configure ports as trusted | dhcp-snooping trusted |
Display and Maintenance
Section titled “Display and Maintenance”| Operation | Command | Description |
|---|---|---|
| Display DHCP Snooping related configurations | show dhcp snooping config | |
| Display DHCP Snooping table | show snooping table |
Configuration Example
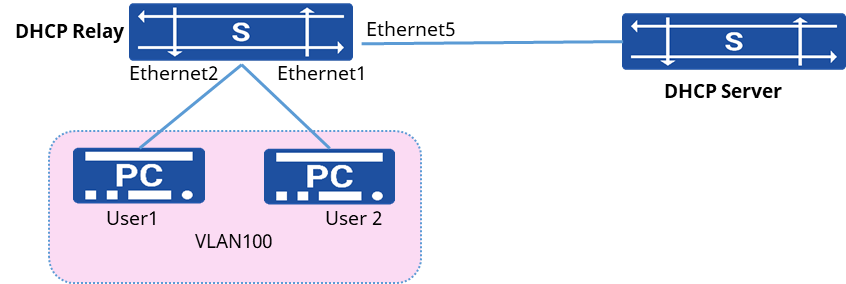
Section titled “Configuration Example”Network requirements
A company wants to assign IP addresses to terminals in the network through a DHCP server in order to facilitate management, and at the same time needs to prohibit users from accessing the network through statically configured IP addresses.
Procedure
- Create VLAN 100 and configure the IP address
sonic(config)# vlan 100sonic(config)# interface ethernet 1sonic(config-if-1)# switchport access vlan 100sonic(config)# interface ethernet 2sonic(config-if-2)# switchport access vlan 100sonic(config)# interface vlan 100sonic(config-vlanif-100)# ip address 10.1.2.1/24- Enable DHCP relay function
sonic(config)# dhcp-relay test v4sonic(config-dhcp-relay-test_v4)# down_link interface vlan 100sonic(config-dhcp-relay-test_v4)# up_link interface 5sonic(config-dhcp-relay-test_v4)# server_ip 10.10.1.1sonic(config-dhcp-relay-test_v4)# loopback_interface loopback 0sonic(config-dhcp-relay-test_v4)# exit- Enabling DHCP Snooping
sonic(config)# dhcp snooping enablesonic(config)# interface vlan 100sonic(config-vlanif-100)# dhcp-snooping enable- Configure the interface to which the DHCP Server is connected as a trusted port
sonic(config)# interface ethernet 5sonic(config-if-5)# dhcp-snooping enablesonic(config-if-5)# dhcp-snooping trusted- Enables DAI and IPSG to check the legitimacy of user messages
sonic(config)# interface vlan 100sonic(config-vlanif-100)# ipv4-source-check enablesonic(config-vlanif-100)# arp anti-attack-check enableVerify configuration
- Check the obtained IP address on the user’s PC.
- Modify the IP address on the user’s PC to a static configuration, ping the external network address and the PC’s gateway address, respectively, The ping operation Failed.
- View the packet loss statistics of the security features on the device.
sonic# show user-bind counterInterface Drop Packets----------- --------------Vlan100 4028ND Snooping Configuration
Section titled “ND Snooping Configuration”Introduction
Section titled “Introduction”The ND Snooping (Neighbor Discovery Snooping) feature is designed for Layer 2 switching environments and serves a similar purpose to DHCP Snooping in IPv6 networks. It records information such as the source IPv6 address, source MAC address, and incoming port of packets. The entries generated by this feature coexist in the Snooping table along with those created by DHCP Snooping.
Explanation of Principles
Section titled “Explanation of Principles”The device supports learning ND Snooping entries through two methods:
- By listening to Duplicate Address Detection (DAD) packets received on interfaces where ND Snooping is enabled. This process helps establish the ND Snooping dynamic binding table.
- By monitoring the Neighbor Discovery Protocol (NDP) table entries on the device. These entries can also be used to update the ND Snooping dynamic binding table.
Through the creation of the ND Snooping dynamic binding table, the device can filter out unauthorized ND packets received from untrusted interfaces. This effectively prevents potential ND attacks.
ND Snooping Configuration
Section titled “ND Snooping Configuration”| Operation | Command | Description |
|---|---|---|
| Enter the system configuration view | configure terminal | |
| Enable ND Snooping function | nd snooping enable | |
| Enter VLAN view | vlan ID | |
| Enable ND Snooping function | nd snooping enable |
Configuration Example
Section titled “Configuration Example”Network requirements
In order to facilitate the management wish to unify the allocation of IPv6 addresses by means of automatic configuration, it is also required:
- Support for obtaining IPv6 addresses through stateful means.
- Support for obtaining IPv6 addresses in a stateless manner.
- Disable users from accessing the network through statically configured IPv6 addresses.
Procedure
- Create VLAN 100 and configure the IP address
sonic(config)# vlan 100sonic(config)# interface ethernet 1sonic(config-if-1)# switchport access vlan 100sonic(config)# interface ethernet 2sonic(config-if-2)# switchport access vlan 100sonic(config)# interface vlan 100sonic(config-vlanif-100)# ip address fd00:100::1/64- Configure the parameters of RA messages sent by the device
sonic(config-vlanif-100)# ipv6 nd ra managed-flag onsonic(config-vlanif-100)# ipv6 nd ra autonomous onsonic(config-vlanif-100)# ipv6 nd ra other-flag onsonic(config-vlanif-100)# ipv6 nd ra prefix fd00:200::1/64sonic(config-vlanif-100)# ipv6 nd ra route-information ::/0 highsonic(config-vlanif-100)# ipv6 nd ra route-information fd00:100::1/64sonic(config-vlanif-100)# ipv6 nd ra route-information fd00:200::1/64- Configure the DHCPv6 relay function of the device
sonic(config)# dhcp-relay test v6sonic(config-dhcp-relay-test_v6)# down_link interface vlan 100sonic(config-dhcp-relay-test_v6)# up_link interface 5sonic(config-dhcp-relay-test_v6)# server_ip fd00:1001:1501::2001sonic(config-dhcp-relay-test_v6)# loopback_interface loopback 0sonic(config-dhcp-relay-test_v6)# exit- Enable DHCP Snooping, ND Snooping function
sonic(config)# dhcp snooping enablesonic(config)# nd snooping enablesonic(config)# interface vlan 100sonic(config-vlanif-100)# dhcp-snooping enablesonic(config-vlanif-100)# nd snooping enable- Configure the interface to which the DHCP Server is connected as a trusted port
sonic(config)# interface ethernet 5sonic(config-if-5)# dhcp-snooping enablesonic(config-if-5)# dhcp-snooping trusted- Enable the security function to check the legitimacy of user messages
sonic(config)# interface vlan 100sonic(config-vlanif-100)# ipv4-source-check enablesonic(config-vlanif-100)# arp anti-attack-check enablesonic(config-vlanif-100)# ipv6-source-check enablesonic(config-vlanif-100)# savi enableVerify configuration
- View the obtained IP address on the PC.
C:\Users\test>ipconfigWindows IP ConfigurationEthernet Adapters Ethernet:Connect to a specific DNS suffix . . :IPv6 address . . . . . . . . . . . . : fd00:100::a570IPv6 address . . . . . . . . . . . . : fd00:200::a495:f96e:6573:c383Temporary IPv6 address . . . . . . . : fd00:200::6d18:d132:77ef:42daLocal Link IPv6 Address. . . . . . . : fe80::a495:f96e:6573:c383%12IPv4 address . . . . . . . . . . . . : 192.168.0.144subnet mask . . . . . . . . . . . . .: 255.255.240.0Default Gateway. . . . . . . . . . . : fe80::201:2ff:fe03:800192.168.0.1- Use the show snooping table command to view the Snooping table entries on the device, the stateful IP addresses and stateless IP addresses have corresponding Snooping table entries.
- Modify the IP address on the user’s PC to a static configuration, ping the external network address and the IPv6 address of the device’s SVI port, respectively, can not ping through.
- View the packet loss statistics of the security features on the device.
sonic# show user-bind counterInterface Drop Packets----------- --------------Vlan100 48Snooping Table Synchronization Configuration
Section titled “Snooping Table Synchronization Configuration”Introduction
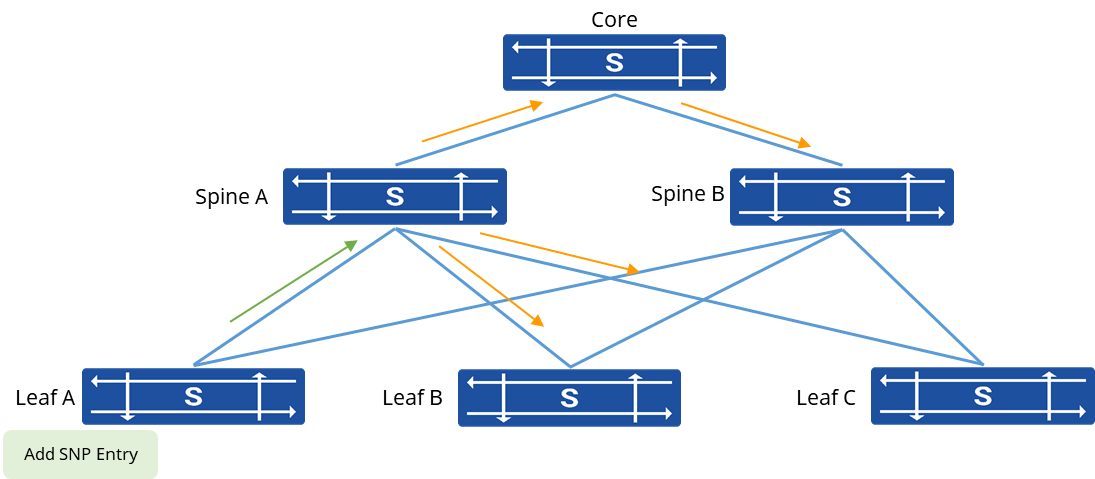
Section titled “Introduction”Snooping entries include DHCP Snooping entries, ND Snooping entries, and user static binding entries, collectively referred to as SNP entries. These entries play a crucial role in performing security functions. In a typical clustered networking environment, Leaf devices act as distributed gateways, connecting multiple APs. Mobile terminals may migrate between APs under different Leaf devices. To minimize migration time, Snooping entries can be synchronized across all devices in the network. Consequently, after migration, there is no need to acquire IP addresses or relearn Snooping entries; legitimate access to the network can be achieved through security authentication. Similarly, user statically configured binding entries can also be synchronized using the SNP synchronization mechanism, reducing the need for redundant configuration across different devices.
Explanation of Principles
Section titled “Explanation of Principles”A protocol interaction is established between Leaf devices and Spine devices to facilitate SNP table synchronization. Typically, a more powerful Spine device is chosen as the server for SNP table synchronization, while the Leaf devices act as clients. When a client receives a DHCP ACK message or an ND protocol’s DAD message, it learns new entries for the SNP table and simultaneously sends update messages to the designated Spine server. The Spine device then propagates these update messages to the remaining Leaf devices within the network. Consequently, all devices within the network gain access to the updated SNP table entries. Generally, interaction messages for table synchronization between devices are encapsulated using Loopback addresses, ensuring that the Loopback addresses between devices are reachable at the layer 3 within the network.
SNP Server Configuration
Section titled “SNP Server Configuration”| Configure Tasks | Instructions | Description |
|---|---|---|
| Enable SNP table synchronization function | Required | |
| Configure the SNP Neighbor IP address | Required | |
| Configure the SNP Peer IP address | Required |
Enabling SNP Table Synchronization Table Synchronization
Section titled “Enabling SNP Table Synchronization Table Synchronization”Enable the SNP table synchronization function on the device and specify the device attributes. By default, the IPv4 address of the device’s Loopback0 interface is used as the source IP address for protocol interaction messages. It’s also possible to specify a specific interface IP as the source address.
Note: This IP address needs to be reachable via layer 3 routing from the Neighbor IP and Peer IP to ensure normal interaction of protocol messages.
| Operation | Command | Description |
|---|---|---|
| Enter the system configuration view | configure terminal | |
| Enable SNP Table Synchronization function | snp-sync enable server [ip-address] |
Configuring SNP Neighbor Address
Section titled “Configuring SNP Neighbor Address”The SNP Neighbor is another device with the SNP Server attribute. It’s important to note that this IP address should match the source IP address configured when enabling SNP Table Synchronization on the neighbor device.
| Operation | Command | Description |
|---|---|---|
| Enter the system configuration view | configure terminal | |
| Configure SNP neighbor IP address | snp-sync neighbor ip-address |
Configuring SNP Peer Address
Section titled “Configuring SNP Peer Address”SNP Peer is a device with the attribute of being a Client, typically a Leaf device. Please note that this IP address should be consistent with the source IP address used when enabling SNP table synchronization for the configured peer device.
| Operation | Command | Description |
|---|---|---|
| Enter the system configuration view | configure terminal | |
| Configure SNP peer IP address | snp-sync peer ip-address |
SNP Client Configuration
Section titled “SNP Client Configuration”In most cases, the Leaf device directly connected to end-user terminals is chosen as the Client in the SNP table synchronization process.
| Operation | Command | Description |
|---|---|---|
| Enter the system configuration view | configure terminal | |
| Configure SNP neighbor IP address | snp-sync neighbor ip-address | The Neighbor is the Server device in the SNP context. |
Display and Maintenance
Section titled “Display and Maintenance”| Operation | Command | Description |
|---|---|---|
| Display SNP table synchronization status | show snooping status |
Configuration Example
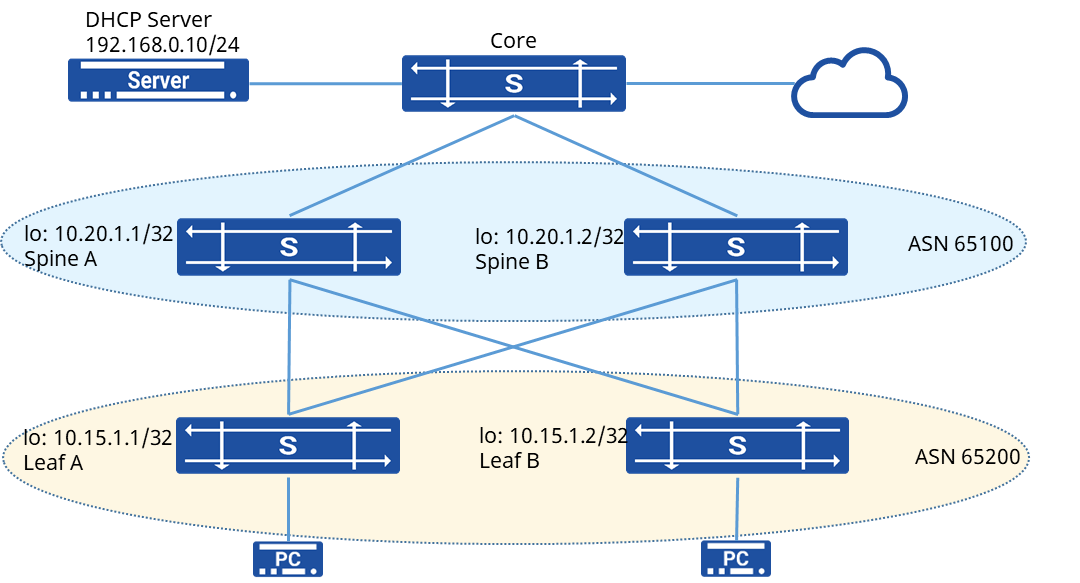
Section titled “Configuration Example”Network requirements
Terminals accessed by different devices belong to the same network segment, and the gateway information of terminals remains unchanged during migration, and IP addresses are not reassigned via DHCP. It is required that SNP table entries can be synchronized between devices, and the new device can still open the security function to check the legality of messages sent by terminals after migration.
Procedure
- Leaf A configuration
# Omit the interface and IP address configuration process
# Establish BGP neighbors
sonic(config)# router bgp 65200sonic(config-router)# bgp router-id 10.15.1.1sonic(config-router)# no bgp ebgp-requires-policysonic(config-router)# neighbor PEER_V4_EBGP peer-groupsonic(config-router)# neighbor 10.20.1.1sonic(config-router)# neighbor 10.20.1.1 bfdsonic(config-router)# neighbor 10.20.1.1 description SpineAsonic(config-router)# neighbor 10.20.1.1 peer-group PEER_V4_EBGPsonic(config-router)# neighbor 10.20.1.2sonic(config-router)# neighbor 10.20.1.2 bfdsonic(config-router)# neighbor 10.20.1.2 description SpineBsonic(config-router)# neighbor 10.20.1.2 peer-group PEER_V4_EBGPsonic(config-router)# address-family ipv4 unicast# Declare the route aboute Loopback0 address
sonic(config-router-af)# network 30.11.0.85/32sonic(config-router-af)# neighbor PEER_V4_EBGP activate# Configure SNP entry synchronization
sonic(config)# snp-sync enable client 10.15.1.1 10.15.1.1sonic(config)# snp-sync neighbor 10.20.1.1sonic(config)# snp-sync neighbor 10.20.1.2# Enable the DHCP Relay and DHCP Snooping functions
sonic(config)# dhcp-relay test v4sonic(config-dhcp-relay-test_v4)# down_link interface vlan 100sonic(config-dhcp-relay-test_v4)# up_link interface 5sonic(config-dhcp-relay-test_v4)# server_ip 192.168.0.10sonic(config-dhcp-relay-test_v4)# loopback_interface loopback 0sonic(config-dhcp-relay-test_v4)# exitsonic(config)# dhcp snooping enablesonic(config)# interface vlan 100sonic(config-vlanif-100)# dhcp-snooping enable# Configure the interface to which the DHCP Server is connected as a trusted port
sonic(config)# interface ethernet 5sonic(config-if-5)# dhcp-snooping enablesonic(config-if-5)# dhcp-snooping trusted- Leaf B and Leaf A are similar in configuration
- Spine A configuration
# Omit the interface and IP address configuration process
# Establish BGP neighbors
sonic(config)# router bgp 65100sonic(config-router)# bgp router-id 10.20.1.1sonic(config-router)# no bgp ebgp-requires-policysonic(config-router)# neighbor PEER_V4_EBGP peer-groupsonic(config-router)# neighbor 10.15.1.1sonic(config-router)# neighbor 10.15.1.1 bfdsonic(config-router)# neighbor 10.15.1.1 description LeafAsonic(config-router)# neighbor 10.15.1.1 peer-group PEER_V4_EBGPsonic(config-router)# neighbor 10.15.1.2sonic(config-router)# neighbor 10.15.1.2 bfdsonic(config-router)# neighbor 10.15.1.2 description LeafBsonic(config-router)# neighbor 10.15.1.2 peer-group PEER_V4_EBGPsonic(config-router)# address-family ipv4 unicast# Declare the route aboute Loopback0 address
sonic(config-router-af)# network 10.20.1.1/32sonic(config-router-af)# neighbor PEER_V4_EBGP activate# Configure SNP entry synchronization
sonic(config)# snp-sync enable server 10.20.1.1 10.20.1.1sonic(config)# snp-sync peer 10.20.1.2sonic(config)# snp-sync neighbor 10.10.1.1sonic(config)# snp-sync neighbor 10.10.1.2Verify configuration
- View the SNP entry synchronization status of the Leaf device
sonic# show snooping statusSwitch ID : 10.15.1.1Source IP address :10.15.1.1Coherent Status : yesSequence Number : 10526Device Mode : clientNeighbors Status Summary :Switch ID Active Sequence Number Connect_active_number------------------------------neighbors----------------------------------10.20.1.1 yes 10526 210.20.1.2 yes 10526 2Total number of Snooping Table :2- View the SNP entry synchronization status of the Spine device
sonic# show snooping statusSwitch ID : 10.20.1.1Source IP address :10.20.1.1Coherent Status : yesSequence Number : 10526Connect Active number : 2Device Mode : serverNeighbors and Peers Status Summary :Switch ID Active Sequence Number Connect_active_number--------------------------------peers------------------------------------10.20.1.2 yes 10526 2------------------------------neighbors----------------------------------10.15.1.1 yes 10526 110.15.1.2 yes 10526 1ARP Attack Detection Configuration
Section titled “ARP Attack Detection Configuration”Introduction
Section titled “Introduction”ARP attack detection is one of the common methods to prevent ARP spoofing. It is used to detect ARP packets based on DHCP Snooping and static binding entries on access devices, preventing ARP attacks from unauthorized users.
Explanation of Principles
Section titled “Explanation of Principles”The method for user legitimacy check involves matching the sender’s IP address and source MAC address in the ARP packet with the static binding entries and DHCP Snooping secure entries on the device. If there is a match between the sender’s IP address and source MAC address in the ARP packet and any of the entries on the device, the ARP packet is considered legitimate and will be forwarded. Otherwise, if no match is found, the packet is considered illegitimate and will be dropped.
ARP trust interfaces do not undergo user legitimacy checks, while ARP untrusted interfaces require user legitimacy checks to prevent attacks from spoofed users.
ARP Attack Detection Configuration
Section titled “ARP Attack Detection Configuration”| Configure Tasks | Instructions | Index |
|---|---|---|
| Enable ARP Attack Detection | Required | |
| Configure ARP Attack Detection trusted ports | Optional |
Enabling ARP Attack Detection
Section titled “Enabling ARP Attack Detection”| Operation | Command | Description |
|---|---|---|
| Enter the system configuration view | configure terminal | |
| Enter the VLAN view | VLAN ID | |
| Enable ARP Attack Detection | arp anti-attack-check enable |
Configuring ARP Attack Detection Trusted Ports
Section titled “Configuring ARP Attack Detection Trusted Ports”For interfaces configured as trusted for ARP attack detection, if a specific VLAN on that interface has ARP attack detection enabled, then ARP packets carrying that VLAN ID will bypass ARP attack detection and be forwarded without any checks.
| Operation | Command | Description |
|---|---|---|
| Enter the system configuration view | configure terminal | |
| Enter the interface view | interface ethernet interface-id | |
| Configure ARP Attack Detection trusted ports | arp anti-attack-check trusted-interface vlan vlan-id |
Configuration Examples
Section titled “Configuration Examples”Network requirements
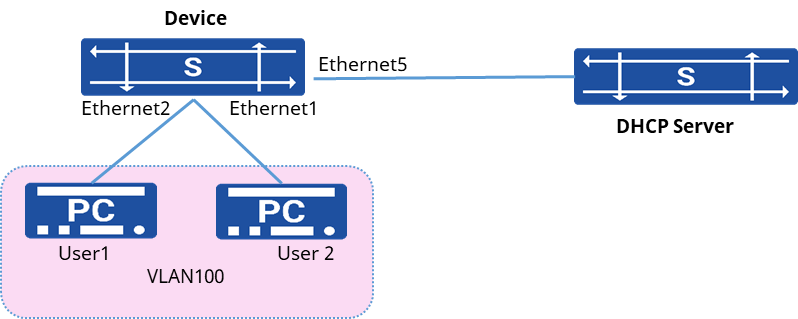
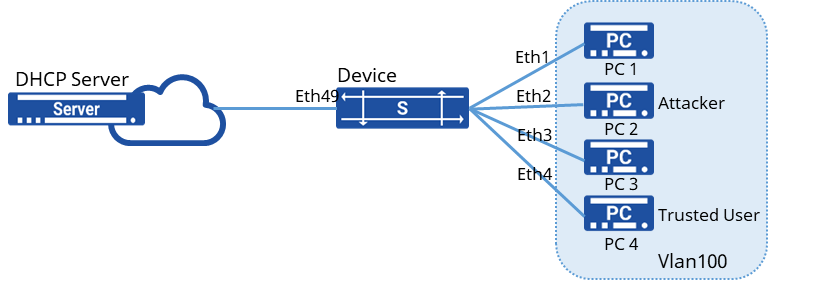
Users access the network through the switch, all users are known to be under the same VLAN100, and all users obtain IP addresses through DHCP Server. The administrator wants to enable the DAI function on the switch to prevent any illegal users from attacking the device by sending illegal ARP messages, which requires:
- PC 1 is a dumb terminal and requires static IP address configuration
- PC 4 is a trusted user and does not perform DAI checks
Procedure
- Omit VLAN creation and VLANif interface configuration
- Enable DHCP relay function
sonic(config)# dhcp-relay test v4sonic(config-dhcp-relay-test_v4)# down_link interface vlan 100sonic(config-dhcp-relay-test_v4)# up_link interface 49sonic(config-dhcp-relay-test_v4)# server_ip 10.10.1.1sonic(config-dhcp-relay-test_v4)# loopback_interface loopback 0sonic(config-dhcp-relay-test_v4)# exit- Enable DHCP Snooping
sonic(config)# dhcp snooping enablesonic(config)# interface vlan 100sonic(config-vlanif-100)# dhcp-snooping enable- Configure the interface to which the DHCP Server is connected as a trusted port
sonic(config)# interface ethernet 49sonic(config-if-49)# dhcp-snooping enablesonic(config-if-49)# dhcp-snooping trusted- Enable DAI function and configure Ethernet4 port as a trusted port
sonic(config)# vlan 100sonic(config-vlan-100)# arp anti-attack-check trusted-interface Ethernet4sonic(config-vlan-100)# arp anti-attack-check enable- Add a static table entry corresponding to the IP address and MAC of PC 1
sonic(config)# user-bind rule 10.100.3.1 00:00:00:01:00:01 1 100Verify configuration
- View device configuration.
# View Snooping static binding table entries
sonic# show user-bind ruleVLAN MAC IP Interface------- ----------------- ------- -----------Vlan100 00:00:00:01:00:01 10.100.3.1 Ethernet1Total : 1# View DAI function configuration
sonic# show anti-attack-check config+--------------+--------------+| Interfaces | Check mode |+==============+==============+| Vlan100 | true |+--------------+--------------+- PC 2 as the attacker, all outgoing ARP messages are discarded.
IPSG Configuration
Section titled “IPSG Configuration”Introduction
Section titled “Introduction”IP Source Guard (IPSG) is a defense mechanism against IP address spoofing attacks. It checks whether a user on a specific VLAN interface is a legitimate user based on the source IP address and source MAC address in the IP packet. IPSG prevents malicious hosts from forging the IP addresses of legitimate hosts, ensuring that unauthorized hosts cannot access or attack the network by specifying their own IP addresses.
Explanation of Principles
Section titled “Explanation of Principles”The method for user legitimacy checks involves comparing the source IP address and source MAC address in the IP packet with the static binding entries, DHCP Snooping entries, and ND Snooping security entries on the device. If there is a match with any of these entries, the IP packet is considered legitimate and forwarded. Otherwise, the packet is considered illegitimate and discarded.
For IP trusted interfaces, user legitimacy checks are not performed. For non-trusted interfaces, user legitimacy checks are necessary to prevent spoofed user attacks.
IPSG Configuration
Section titled “IPSG Configuration”| Configure Tasks | Instructions | Index |
|---|---|---|
| Enable IPSG | Required | |
| Configure IPSG trusted ports | Optional |
Enabling IPSG
Section titled “Enabling IPSG”| Operation | Command | Description |
|---|---|---|
| Enter the system configuration view | configure terminal | |
| Enter the VLAN view | vlan ID | |
| Enable IPSG function | ipv4-source-check enable ipv6-source-check enable |
Configuring IPSG Trusted Ports
Section titled “Configuring IPSG Trusted Ports”For interfaces configured as IP Source Guard (IPSG) trusted interfaces, if IPSG is enabled for a specific VLAN on that interface, then all IP packets received on that interface with the corresponding VLAN ID are allowed to pass through without any further inspection.
| Operation | Command | Description |
|---|---|---|
| Enter the system configuration view | configure terminal | |
| Enter the interface view | interface ethernet interface-id | |
| Configure IPSG trusted ports | ipv4-source-check trusted-interface vlan vlan-id ipv6-source-check trusted-interface vlan vlan-id |
Configuration Example
Section titled “Configuration Example”Network requirements
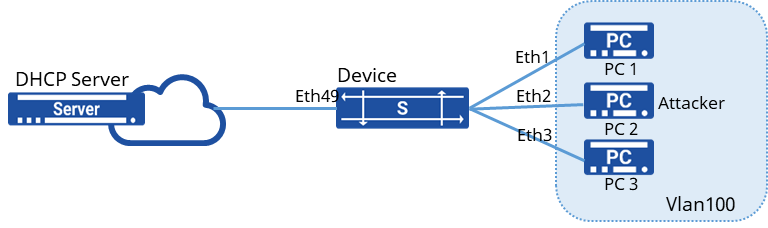
Users access the network through the switch, all users are known to be under the same VLAN100, and all users access the network with IPv4 and IPv6 dual stack, the administrator wants to enable the security function on the switch to prevent illegal users from accessing the network through private IP addresses, where:
- PC 4 is a silent terminal and needs to access the network by manually configuring the IP address
- PC 2 is an illegal user with a simulated private IP address

Procedure
- Omit the creation of VLAN and VLANif interface configuration
- Enable DHCP relay function
sonic(config)# dhcp-relay test v4sonic(config-dhcp-relay-test_v4)# down_link interface vlan 100sonic(config-dhcp-relay-test_v4)# up_link interface 49sonic(config-dhcp-relay-test_v4)# server_ip 10.10.1.1sonic(config-dhcp-relay-test_v4)# loopback_interface loopback 0sonic(config-dhcp-relay-test_v4)# exitsonic(config)# dhcp-relay test1 v6sonic(config-dhcp-relay-test_v6)# down_link interface vlan 100sonic(config-dhcp-relay-test_v6)# up_link interface 49sonic(config-dhcp-relay-test_v6)# server_ip 4005::1sonic(config-dhcp-relay-test_v6)# loopback_interface loopback 0sonic(config-dhcp-relay-test_v6)# exit- Enabling DHCP Snooping
sonic(config)# dhcp snooping enablesonic(config)# interface vlan 100sonic(config-vlanif-100)# dhcp-snooping enable- Configure the interface connected to DHCP Server as a trusted port
sonic(config)# interface ethernet 49sonic(config-if-49)# dhcp-snooping enablesonic(config-if-49)# dhcp-snooping trusted- Enable IPSG function and configure Ethernet4 port as a trusted port
sonic(config)# vlan 100sonic(config-vlan-100)# ipv4-source-check enablesonic(config-vlan-100)# ipv6-source-check enablesonic(config-vlan-100)# ipv4-source-check trusted-interface Ethernet4sonic(config-vlan-100)# ipv6-source-check trusted-interface Ethernet4Verify configuration
- View device configuration
# View IPSG feature configuration
sonic# ipv4-source-check config+--------------+--------------+----------------------+| Interfaces | Check mode | Trusted interfaces |+==============+==============+======================+| Vlan100 | true | ['Ethernet1'] |+--------------+--------------+----------------------+# View IPSGv6 feature configuration
sonic# ipv6-source-check config+--------------+--------------+----------------------+| Interfaces | Check mode | Trusted interfaces |+==============+==============+======================+| Vlan100 | true | ['Ethernet1'] |+--------------+--------------+----------------------+PC1, PC3, PC4 can access the network normally, PC2 cannot access the network, and the packet loss statistics of the security function are counted.SAVI Configuration
Section titled “SAVI Configuration”Introduction
Section titled “Introduction”SAVI (Source Address Validation Improvement) is a mechanism used on access devices to validate the authenticity of IPv6 Neighbor Discovery (ND) protocol packets. It is based on ND Snooping, DHCP Snooping, and static binding entries, and it helps prevent unauthorized packets from entering the internal network.
Explanation of Principles
Section titled “Explanation of Principles”The method of user legitimacy validation involves comparing ND packets with the device’s static binding entries, ND Snooping entries, and DHCP Snooping security entries. If there is a match between the source IPv6 address and the source MAC address in any of these entries, the ND packet is considered legitimate and allowed to be forwarded. Otherwise, if no match is found, the packet is deemed unauthorized and discarded. It’s important to note that Router Advertisement (RA) packets are not subject to SAVI checks and are controlled by the RA Guard functionality. Additionally, Router Solicitation (RS) packets with Link-local source addresses are allowed to pass through without further validation.
SAVI Configuration
Section titled “SAVI Configuration”| Configure Tasks | Instructions | Index | Index |
|---|---|---|---|
| Enable SAVI | Required | ||
| Configure SAVI trusted ports | Optional |
Enabling SAVI
Section titled “Enabling SAVI”| Operation | Command | Description |
|---|---|---|
| Enter the system configuration view | configure terminal | |
| Enter the VLAN view | vlan ID | |
| Enable SAVI function | savi enable |
Configuring SAVI Trusted Ports
Section titled “Configuring SAVI Trusted Ports”For ports configured as SAVI trusted, if a specific VLAN on that port has SAVI functionality enabled, any ND packets received on that interface with the corresponding VLAN ID will not undergo SAVI validation. Instead, they will be allowed to pass through without SAVI checks.
| Operation | Command | Description |
|---|---|---|
| Enter the system configuration view | configure terminal | |
| Enter the interface view | interface ethernet interface-id | |
| Configure SAVI trusted ports | savi trusted-interface vlan vlan-id |
Configuration Example
Section titled “Configuration Example”Network requirements
Users access the network through the switch, all users are known to be under the same VLAN100, and all users access the network in IPv6. The administrator wants to enable security features on the switch to prevent illegal users from accessing the network through private IP addresses, where: PC 2 statically configures IP addresses to simulate illegal private IP users.
Procedure
- Omit VLAN creation and VLANif interface configuration
- Enable DHCP relay function
sonic(config)# dhcp-relay test1 v6sonic(config-dhcp-relay-test_v6)# down_link interface vlan 100sonic(config-dhcp-relay-test_v6)# up_link interface 49sonic(config-dhcp-relay-test_v6)# server_ip 4005::1sonic(config-dhcp-relay-test_v6)# loopback_interface loopback 0sonic(config-dhcp-relay-test_v6)# exit- Enabling DHCP Snooping
sonic(config)# dhcp snooping enablesonic(config)# interface vlan 100sonic(config-vlanif-100)# dhcp-snooping enable- Configure the interface connected to DHCP Server as a DHCP Snooping trusted port
sonic(config)# interface ethernet 49sonic(config-if-49)# dhcp-snooping enablesonic(config-if-49)# dhcp-snooping trusted- Enabling ND Snooping
sonic(config)# nd snooping enablesonic(config)# interface vlan 100sonic(config-vlanif-100)# nd snooping enable- Turn on SAVI function
sonic(config)# vlan 100sonic(config-vlan-100)# savi enableVerify configuration
- View device configuration.
# View SAVI function configuration
sonic# show savi config+--------------+--------------+| Interfaces | Check mode |+==============+==============+| Vlan100 | true |+--------------+--------------+- PC 1, PC 3 can access the network normally, PC 2 cannot access the network, and the packet loss statistics of the security function are counted.
RA Guard Configuration
Section titled “RA Guard Configuration”Introduction
Section titled “Introduction”RA Guard functionality is used on Layer 2 access devices to prevent Router Advertisement (RA) message spoofing attacks.
When a Layer 2 access device receives an RA message with a unicast or multicast MAC address, the RA Guard functionality processes the RA message as follows:
- If the port is not configured with a port role, the RA message is directly forwarded.
- If the port role is a router, the RA message is directly forwarded.
- If the port role is a user, the RA message is directly discarded.
- If the port role is hybrid, the port’s RA Guard policy is matched.
- If the RA Guard policy has configured matching rules, the RA message must match all rules successfully to be forwarded. Otherwise, the message is discarded.
- If the RA Guard policy does not have matching rules configured, all RA messages are discarded.
Configuration Example
Section titled “Configuration Example”Network requirements
To prevent Route Announcement Message (RA message) spoofing attack, you need to configure RA Guard policy rules on the Device.
- Interface Ethernet 2 is connected to an unknown device, and the user wants the interface to match and filter RA messages according to RA Guard policy rules.
- Interface Ethernet 1 is connected to a user who wants the RA messages received on this interface to be discarded directly.
- Interface Ethernet 3 is connected to a Device and the user wants the interface to fully trust RA messages to be forwarded directly.

Procedure
- Create a VLAN and add an interface
sonic(config)# vlan 100sonic(config)# port-group ethernet 1-3sonic(config-port-group 1-3)# switchport access vlan 100- Configure the interface role
sonic(config)# interface ethernet 1sonic(config-if-1)# raguard role usersonic(config)# interface ethernet 2sonic(config-if-1)# raguard role hybridsonic(config)# interface ethernet 3sonic(config-if-1)# raguard role router- Configure RA Guard policy
sonic(config)# vlan 100sonic(config-vlan-100)# raguard policy src-ip fe80::1a17:25ff:fe37:6722