
Getting Started with VMware ESXi
此内容尚不支持你的语言。
Preamble
Section titled “Preamble”What will we accomplish
Section titled “What will we accomplish”This guide provides a step-by-step tutorial for deploying the AsterNOS-VPP virtual gateway on a VMware ESXi environment.
By following this guide, you will transform a standard x86 server into a high-performance virtual router capable of Line-Rate L2/L3 Forwarding and NAT services. Unlike standard virtual machine deployments, this guide leverages PCI Passthrough technology to bypass the virtualization layer, unlocking the full performance potential of the hardware.
The scenarios covered include:
- PCI Passthrough: Configuring the host to grant the VM direct access to physical network interfaces.
- L2/L3 Switching: Configuring VLANs and Inter-VLAN routing to achieve wire-speed forwarding.
- NAT Gateway: Configuring SNAT to provide internet access for internal subnets.
Prerequisites
Section titled “Prerequisites”To successfully complete this task, readers should have:
- Virtualization Knowledge: Familiarity with VMware ESXi management (Web Client).
- Networking Fundamentals: Understanding of IP addressing, VLANs, and basic routing concepts.
- Hardware Requirements: An x86 server with Intel VT-d enabled in BIOS and a supported network card (e.g., Intel I350).
Supported Network Adapters
Section titled “Supported Network Adapters”| Manufacturer | Series / Type | Vendor ID | Device ID / Class |
|---|---|---|---|
| Intel | All Network Devices | 0x8086 | Class 0x0200 |
| Intel | QAT Devices (VFs) | 0x8086 | Class 0x0b40 with Device IDs:0x0443, 0x18a1, 0x19e3, 0x37c9, 0x6f55, 0x18ef, 0x4941, 0x4943, 0x4945 |
| Cisco | VIC | 0x1137 | 0x0043, 0x0071 |
| Chelsio | T4/T5 | 0x1425 | 0x4000 - 0x5fff |
| Amazon | Elastic Network Adapter (ENA) | 0x1d0f | 0xec20, 0xec21 |
| Marvell (Cavium) | Legacy Cavium Adapters | 0x177d | 0x9712 |
| Marvell (QLogic) | FastlinQ QL41000 Series | 0x1077 | 0x1003, 0x1004 |
| Broadcom | NetXtreme S & E Series Only | 0x14e4 | 0x1604, 0x1605, 0x1614, 0x1606, 0x1609 All IDs > 0x16c0 EXCEPT: 0x16c6, 0x16c7, 0x16dd, 0x16f7, 0x16fd, 0x16fe, 0x170d, 0x170c, 0x170e, 0x1712, 0x1713 |
| vNIC | 0x1ae0 | 0x0042 |
License Activation(Optional)
Section titled “License Activation(Optional)”The system defaults to the Free Edition. To unlock Commercial Edition features, follow these steps:
- Get Serial Number: Run
show versionin the SONiC CLI and note the Serial Number. - Obtain License: Send the SN to us to receive your license file.
- Install File: Upload the license file to the directory
/etc/sonic/lic/. - Apply License: Run one of the following commands to activate:
- Bash:
sudo licmgrdctl update - CLI:
license update
- Bash:
Preparation and Environmental Overview
Section titled “Preparation and Environmental Overview”Topology Map
Section titled “Topology Map”
Network Planning
Section titled “Network Planning”Before configuring the software, we must define the physical and logical connections. The setup uses one management port (virtual) and three data ports (physical passthrough).
Lab Components
Section titled “Lab Components”| Device Type | Role in Topology | Role/Description |
|---|---|---|
| VMware ESXi 7.0 | Host Machine | Physical Host |
| AsterNOS-VPP VM | Virtual Gateway | 8GB RAM, 4-Core CPU |
| PC1 | Internal Client | LAN1 Client, used for performance testing. |
| PC2 | Internal Client | LAN2 Client, used for performance testing. |
Target Configuration Plan
Section titled “Target Configuration Plan”| Device / Interface | Physical Mapping | IP Address / Subnet | Notes / Connection Point |
|---|---|---|---|
| Ethernet1 | Host Machine | / | Management Interface Connected to ESXi vSwitch0 |
| Ethernet2 | vmnic1 (Passthrough) | 192.168.200.166/24 | WAN Interface Connects to Upstream Gateway |
| Ethernet3 | vmnic2 (Passthrough) | N/A (L2 Port) | Member of VLAN 100 Connects to PC 1 |
| Ethernet4 | vmnic3 (Passthrough) | N/A (L2 Port) | Member of VLAN 200 Connects to PC 2 |
| Interface Vlan 100 | (Logical) | 10.1.1.1/24 | Gateway for LAN1 |
| Interface Vlan 200 | (Logical) | 10.1.2.1/24 | Gateway for LAN2 |
Required Tools & Files
Section titled “Required Tools & Files”-
Software Download
-
Conversion Tool: qemu-img (Required for converting qcow2 to vmdk on a local PC before uploading).
-
Testing Tools: iperf3 (Must be installed on both Client PCs for throughput testing).
Infrastructure Deployment
Section titled “Infrastructure Deployment”Image Preparation
Section titled “Image Preparation”The AsterNOS image is typically distributed in .qcow2 format. VMware ESXi requires the .vmdk format.
- Convert the Image: Run the following command on your local machine (Windows/Linux) to convert the image:
qemu-img convert -f qcow2 -O vmdk sonic-vpp.img AsterNOS-VPP.vmdk
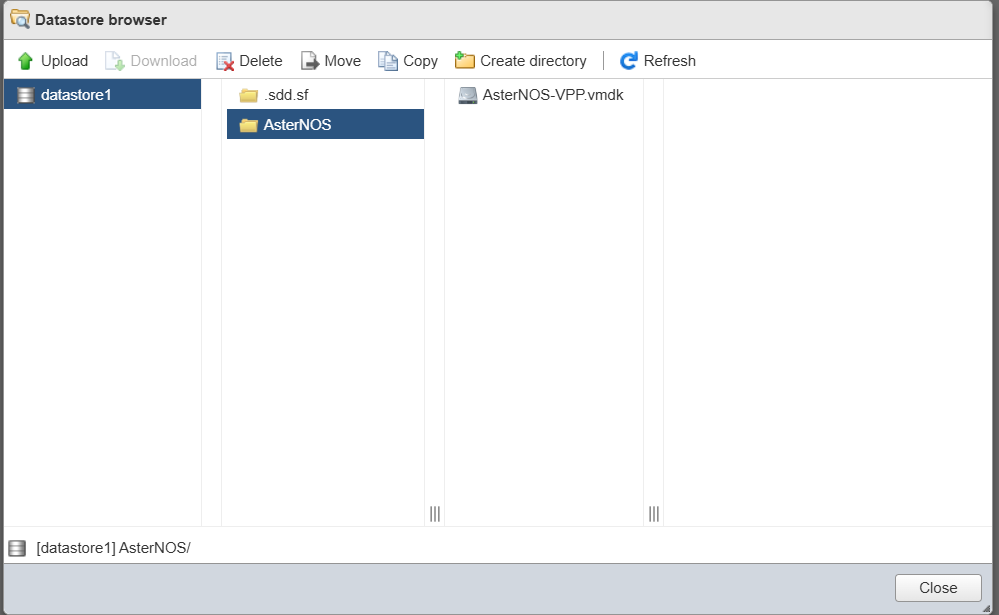
- Upload to ESXi: Log in to your ESXi Web Client. Navigate to Storage->Datastore Browser. Create a directory (e.g., AsterNOS) and upload the AsterNOS-VPP.vmdk file.
Configure Host Hardware
Section titled “Configure Host Hardware”To achieve line-rate performance, the VM must bypass the virtual switch and access the network cards directly.
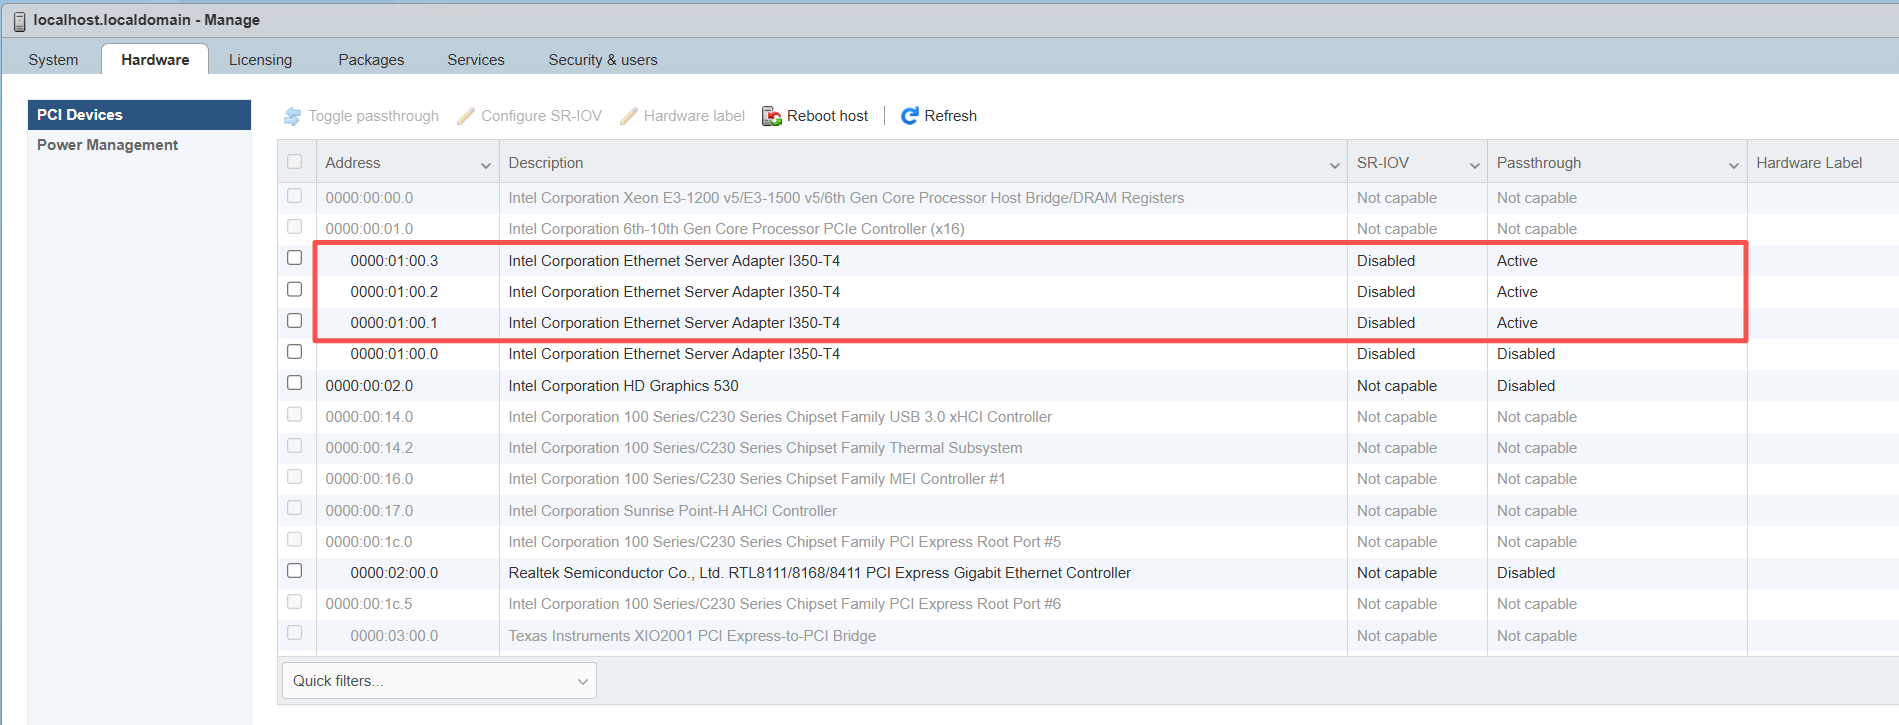
- Navigate to Manage->Hardware->PCI Devices.
- Locate your network adapter.
- Select the ports intended for data traffic.
- Click Toggle passthrough. Verify the status changes to Active.
- Reboot the ESXi host to apply changes.
Virtual Machine Creation
Section titled “Virtual Machine Creation”Create the VM with specific settings to support PCI passthrough and stability.
- Creation Wizard: Select Create a new virtual machine.
- Guest OS:
- Family: Linux
- Version: Debian GNU/Linux 11 (64-bit)
- Hardware Customization:
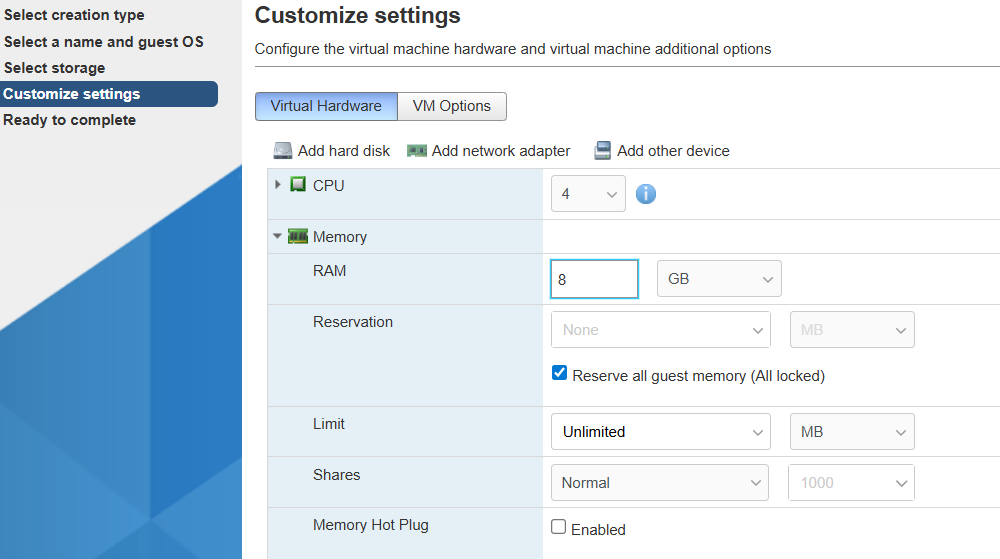
- CPU: 4 vCPUs.
- Memory: 8GB.
- Important: Expand Memory settings and check “Reserve all guest memory” (All locked). PCI passthrough devices will fail to start without this.
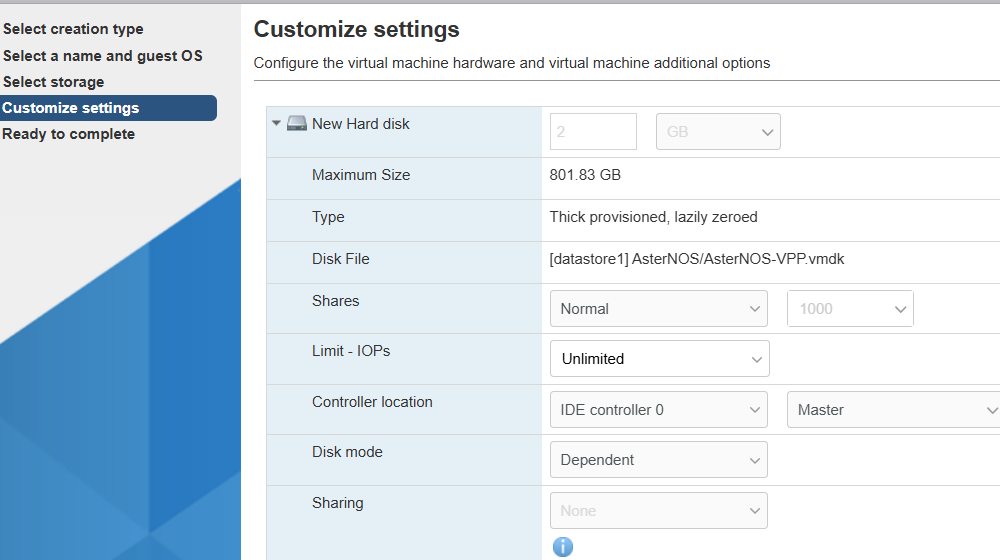
Hard Disk: Delete the default hard disk.
Select “Add Existing Hard Disk” and browse to your uploaded AsterNOS-Fixed.vmdk.
Controller: Ensure the disk is attached to an IDE Controller.
Network Adapter 1: Connect to VM Network (vSwitch0). This maps to Ethernet1 (Management).
PCI Devices: Click Add other device->PCI device. Add the passthrough ports. These map to Ethernet2, Ethernet3, etc.
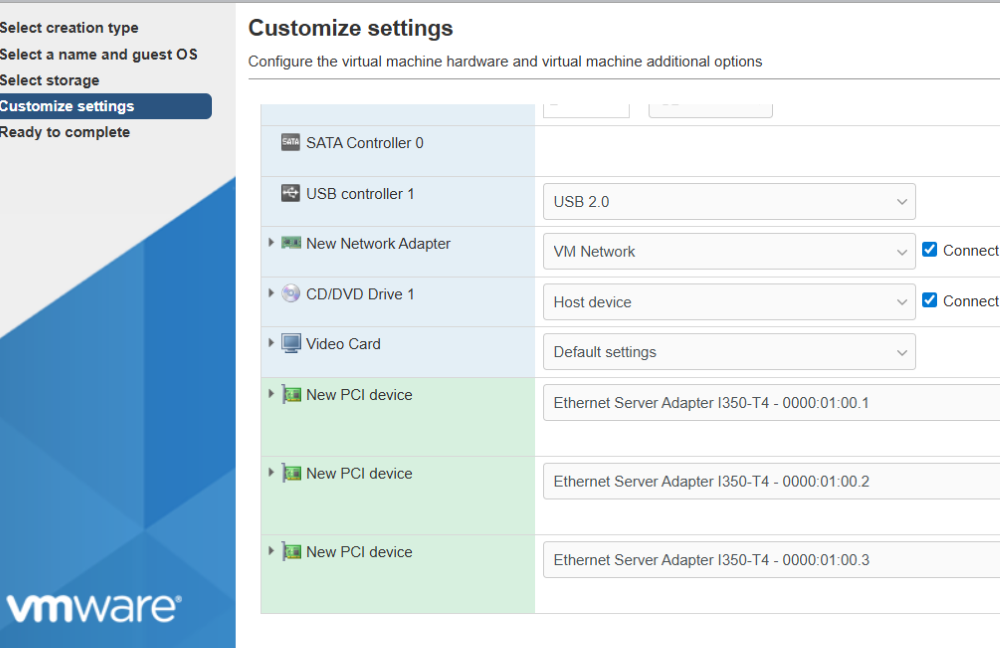
4. Finish: Complete the wizard and power on the VM.
Network Configuration
Section titled “Network Configuration”In this phase, we will complete all global network configurations at once. To facilitate the initial Layer 2 performance test, we will initially assign both LAN ports (Ethernet3 and Ethernet4) to VLAN 100.
Access VM
Section titled “Access VM”Log in to the console and enter the CLI configuration view.
- Login name: admin
- Password: asteros
admin@sonic:\~$ sonic-clisonic# configure terminalConfigure WAN & Default Route
Section titled “Configure WAN & Default Route”Configure the upstream interface (Ethernet2) with a static IP and set the default gateway to ensure internet connectivity.
\# Configure WAN Interfacesonic(config)# interface Ethernet 2sonic(config-if-Ethernet2)# ip address 192.168.200.166/24sonic(config-if-Ethernet2)# nat-zone 1sonic(config-if-Ethernet2)# no shutdownsonic(config-if-Ethernet2)# exit\# Configure Default Routesonic(config)# ip route 0.0.0.0/0 192.168.200.1Configure VLANs & Gateways
Section titled “Configure VLANs & Gateways”Create the necessary VLANs and configure their IP addresses. These will serve as gateways for the internal PCs.
\# Create VLANssonic(config)# vlan 100sonic(config-vlan-100)# exitsonic(config)# vlan 200sonic(config-vlan-200)# exit\# Configure Gateway for VLAN 100sonic(config)# interface Vlan 100sonic(config-vlanif-Vlan100)# ip address 10.1.1.1/24sonic(config-vlanif-Vlan100)# exit\# Configure Gateway for VLAN 200sonic(config)# interface Vlan 200sonic(config-vlanif-Vlan200)# ip address 10.1.2.1/24sonic(config-vlanif-Vlan200)# exitConfigure NAT
Section titled “Configure NAT”Set up the Source NAT rules to map internal private IP addresses to the WAN public IP address.
sonic(config)# nat enablesonic(config)# nat pool lan_pool 192.168.200.166sonic(config)# nat binding lan_binding lan_poolConfigure LAN Interfaces
Section titled “Configure LAN Interfaces”For the first round of testing, we will assign BOTH Ethernet3 (PC1) and Ethernet4 (PC2) to VLAN 100. This creates a Layer 2 loop-free path for line-rate verification.
\# Configure Ethernet3sonic(config)# interface Ethernet 3sonic(config-if-Ethernet3)# no router-interfacesonic(config-if-Ethernet3)# switchport access vlan 100sonic(config-if-Ethernet3)# no shutdownsonic(config-if-Ethernet3)# exit\# Configure Ethernet4 (Initially in VLAN 100)sonic(config)# interface Ethernet 4sonic(config-if-Ethernet4)# no router-interfacesonic(config-if-Ethernet4)# switchport access vlan 100sonic(config-if-Ethernet4)# no shutdownsonic(config-if-Ethernet4)# exit\# Save Configurationsonic(config)# exitsonic# writeVerification
Section titled “Verification”Phase 1:Layer 2 Switching Performance
Section titled “Phase 1:Layer 2 Switching Performance”Verify that the AsterNOS-VPP VM performs Layer 2 forwarding at line rate.
- PC Setup:
- PC 1: IP 10.1.1.10, Mask 255.255.255.0, Gateway 10.1.1.1.
- PC 2: IP 10.1.1.11, Mask 255.255.255.0, Gateway 10.1.1.1.
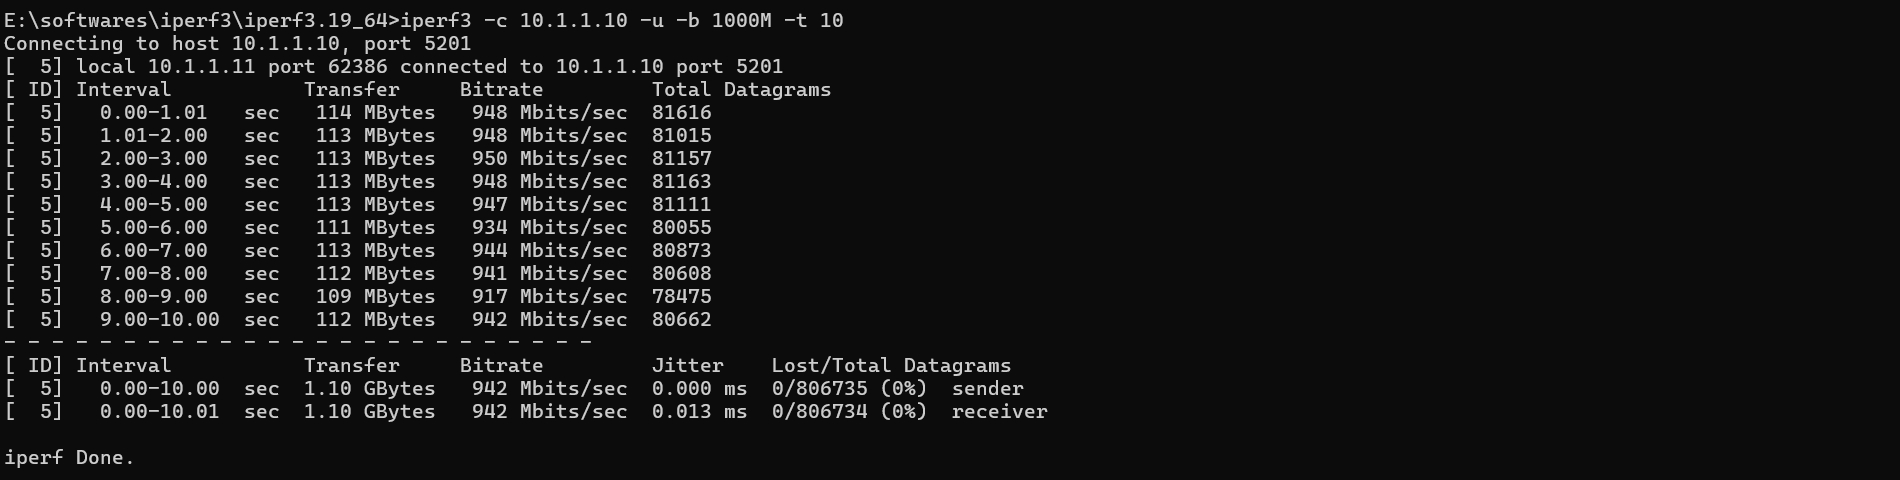
- Run iperf3:
- Server (PC 1): iperf3 -s
- Client (PC 2): iperf3 -c 10.1.1.10 -u -b 1000M -t 10
- Expected Result: The bitrate should stabilize around 950 Mbits/sec.
Phase 2:Reconfigure for Layer 3 & NAT
Section titled “Phase 2:Reconfigure for Layer 3 & NAT”- AsterNOS Configuration Update:
- Move Ethernet4 from VLAN 100 to VLAN 200.
sonic# configure terminalsonic(config)# interface Ethernet 4sonic(config-if-Ethernet4)# no switchport vlan 100sonic(config-if-Ethernet4)# switchport access vlan 200onic(config-if-Ethernet4)# exitsonic(config)# exitsonic# write- PC 2 Network Reconfiguration
- IP Address: Change to 10.1.2.10
- Subnet Mask: 255.255.255.0
- Default Gateway: 10.1.2.1
Layer 3 Routing & Internet Access Verification
Section titled “Layer 3 Routing & Internet Access Verification”- Layer 3 Performance Test (Inter-VLAN): Verify the routing performance between VLAN 100 and VLAN 200.
- Server (PC 1 - 10.1.1.10): iperf3 -s
- Client (PC 2 - 10.1.2.10): iperf3 -c 10.1.1.10 -u -b 1000M -t 10
- Result:

- Internet Access Test (NAT): Verify that PC 1 can access the internet via the AsterNOS gateway.
- Command: ping 8.8.8.8
- Result: Successful reply.

- Verify NAT Table: Check the NAT translation table on AsterNOS to confirm the session.
sonic# show nat translations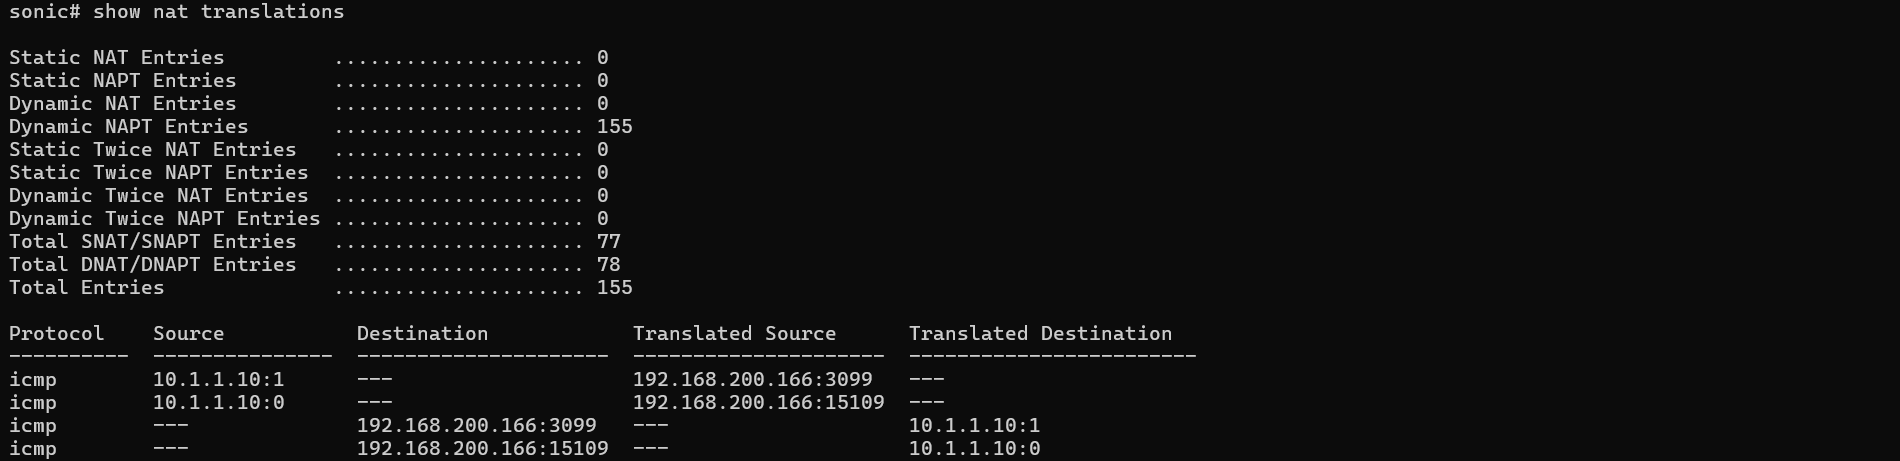
Conclusion
Section titled “Conclusion”This guide demonstrates that AsterNOS-VPP successfully combines the robust SONiC ecosystem with the high-performance VPP data plane.
By leveraging virtual machines and PCI passthrough on standard x86 servers, users can easily build an enterprise-grade virtual gateway capable of line-rate Layer 2/3 forwarding and NAT. For network environments seeking high performance, flexibility, and cost efficiency, AsterNOS-VPP is an ideal solution.