
IPsec-VPP Case
此内容尚不支持你的语言。
Introduction
Section titled “Introduction”This guide provides a comprehensive, step-by-step tutorial for establishing secure IP Security (IPSec) VPN tunnels on the Asterfusion ET2500 Open Intelligent Gateway. By leveraging the high-performance VPP data plane, you will learn how to build encrypted networks that are both secure and scalable.
What This Guide Will Accomplish
Section titled “What This Guide Will Accomplish”By following this guide, you will learn how to deploy robust VPN architectures ranging from simple point-to-point connections to complex multi-site enterprise networks. The scenarios covered are:
- Scenario 1: Site-to-Site VPN (Direct Connection) Establishing a standard point-to-point tunnel between two gateways.
- Scenario 2: Hub-and-Spoke VPN (Multi-Site) Configuring a central Hub gateway to accept concurrent connections from multiple Branch offices.
- Scenario 3: NAT Traversal (NAT-T) Deploying a branch gateway behind a NAT device using ID Masquerading.
Scenario 1: Site-to-Site VPN (Direct Connection)
Section titled “Scenario 1: Site-to-Site VPN (Direct Connection)”1. Scenario Overview
Section titled “1. Scenario Overview”We establish a standard tunnel between two sites. To optimize the process, we assign distinct roles:
-Site B (Responder): Configures parameters and passively waits. -Site A (Initiator): Configures parameters and triggers the negotiation by binding the policy to the interface.
2. Network Topology Plan
Section titled “2. Network Topology Plan”
| Role | Device | WAN IP(Underlay) | LAN IP(Overlay) | Protected Subnet |
|---|---|---|---|---|
| Site A (Initiator) | AsterNOS | 192.168.200.166 | 20.20.20.1 | 20.20.20.0/24 |
| Site B (Responder) | AsterNOS | 192.168.200.177 | 10.10.10.1 | 10.10.10.0/24 |
3. Configuration Steps
Section titled “3. Configuration Steps”Step 1: Initialize Network (Interfaces & Routing)
sonic# configure terminal # Example on Site A (.166):sonic(config)# interface ethernet 1sonic(config-if-1)# ip address 192.168.200.166/24sonic(config-if-1)# exit
sonic(config)# ip route 0.0.0.0/0 192.168.200.1 # (Perform symmetrical configuration on Site B .177)sonic(config)# interface ethernet 1sonic(config-if-1)# ip address 192.168.200.177/24sonic(config-if-1)# exit
sonic(config)# ip route 0.0.0.0/0 192.168.200.1
Step 2: Configure Site B (Responder - .177)
Define the policy globally, then bind it to the interface to enable listening.
Define Global Policysonic(config)# ipsec testsonic(config-ipsec-test)# shared_key_mic string test1234sonic(config-ipsec-test)# ike crypto_alg aes-cbc crypto_alg_size 256 integ_alg sha1-96 dh modp-2048sonic(config-ipsec-test)# ike local type ip4 data 192.168.200.177sonic(config-ipsec-test)# ike remote type ip4 data 192.168.200.166 # Traffic Selector (Local: 10.x <-> Remote: 20.x)sonic(config-ipsec-test)# ike traffic_selector local ip4 addr_start 10.10.10.0 addr_end 10.10.10.255sonic(config-ipsec-test)# ike traffic_selector remote ip4 addr_start 20.20.20.0 addr_end 20.20.20.255sonic(config-ipsec-test)# sa crypto_alg aes-cbc crypto_alg_size 256 integ_alg sha1-96sonic(config-ipsec-test)# sa tunnel ip4 src_ip 192.168.200.177 dst_ip 192.168.200.166 next_hop 192.168.200.166 remote_ip 20.20.20.0/24 shared_interface Ethernet1sonic(config-ipsec-test)# exitStep 3: Configure Site A (Initiator - .166)
Define the policy globally.The final step of binding it to the interface triggers the negotiation.
1. Define Global Policysonic(config)# ipsec testsonic(config-ipsec-test)# shared_key_mic string test1234sonic(config-ipsec-test)# ike crypto_alg aes-cbc crypto_alg_size 256 integ_alg sha1-96 dh modp-2048sonic(config-ipsec-test)# ike local type ip4 data 192.168.200.166sonic(config-ipsec-test)# ike remote type ip4 data 192.168.200.177 # Traffic Selector (Local: 20.x <-> Remote: 10.x)sonic(config-ipsec-test)# ike traffic_selector local ip4 addr_start 20.20.20.0 addr_end 20.20.20.255sonic(config-ipsec-test)# ike traffic_selector remote ip4 addr_start 10.10.10.0 addr_end 10.10.10.255sonic(config-ipsec-test)# sa crypto_alg aes-cbc crypto_alg_size 256 integ_alg sha1-96sonic(config-ipsec-test)# sa tunnel ip4 src_ip 192.168.200.166 dst_ip 192.168.200.177 next_hop 192.168.200.177 remote_ip 10.10.10.0/24 shared_interface Ethernet1sonic(config-ipsec-test)# exit # 2. Bind to WAN Interface (Triggers Connection)sonic(config)# interface ethernet 1sonic(config-if-1)# ipsec test peer ip4 192.168.200.177sonic(config-if-1)# exit4.Verification
Section titled “4.Verification”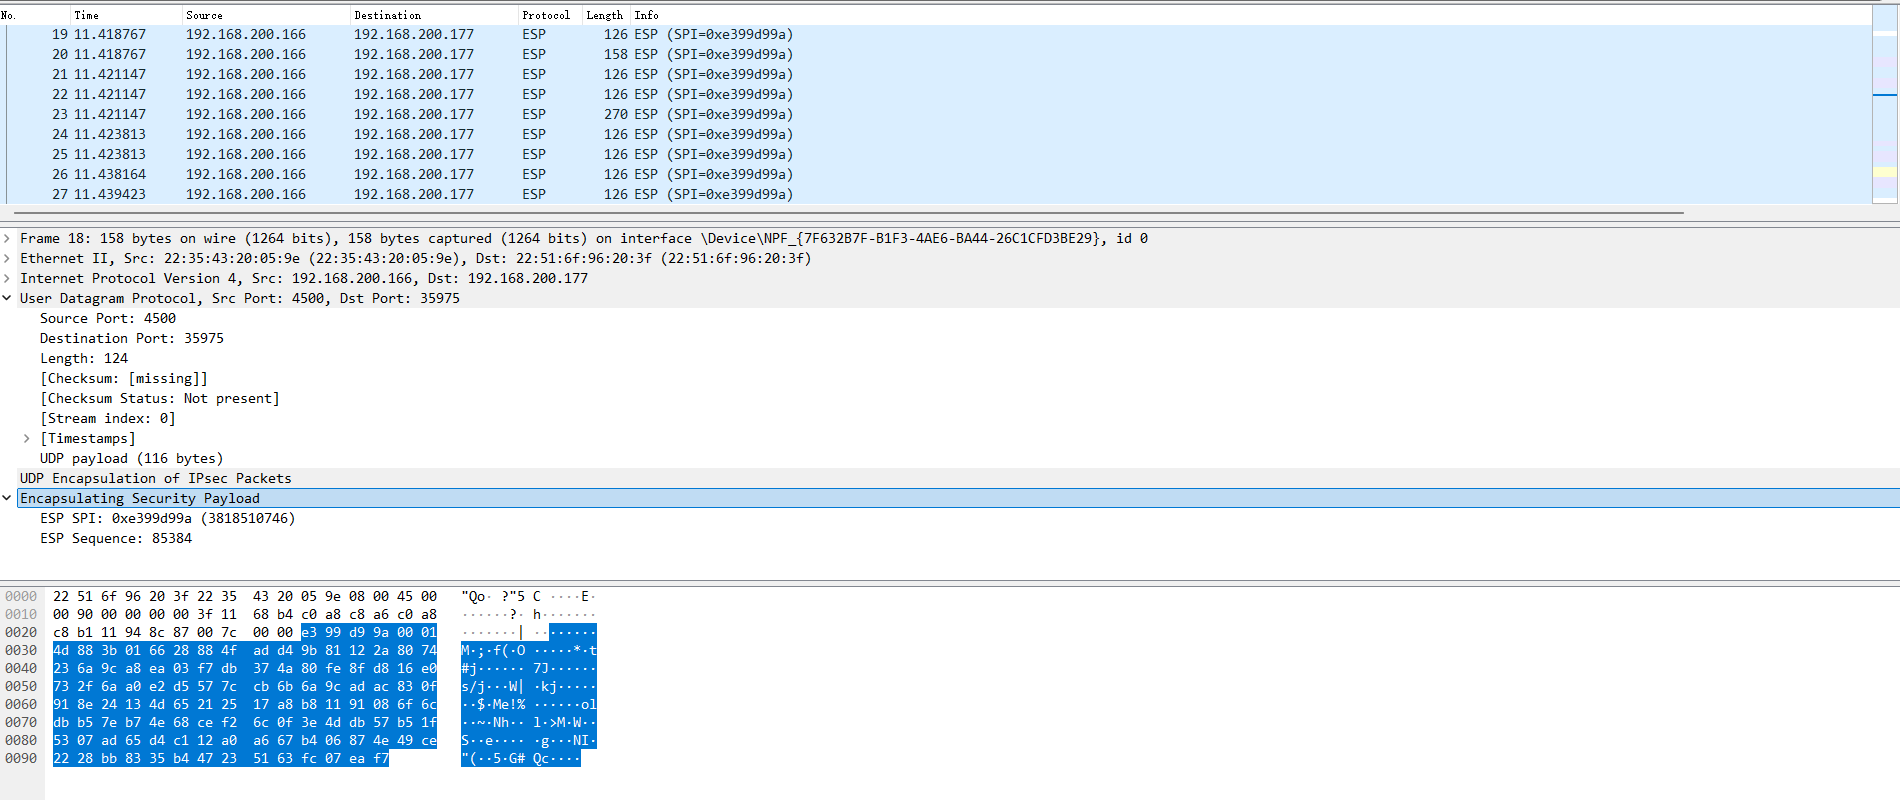
Scenario 2: Hub-and-Spoke VPN (Multi-Site)
Section titled “Scenario 2: Hub-and-Spoke VPN (Multi-Site)”1. Scenario Overview
Section titled “1. Scenario Overview”- Hub (.188) - Responder: Configures policies globally and binds them to the interface to listen.
- Spokes (.166 / .177) - Initiators: Configure policies globally and trigger negotiation by binding to the interface.
2. Network Topology Plan
Section titled “2. Network Topology Plan”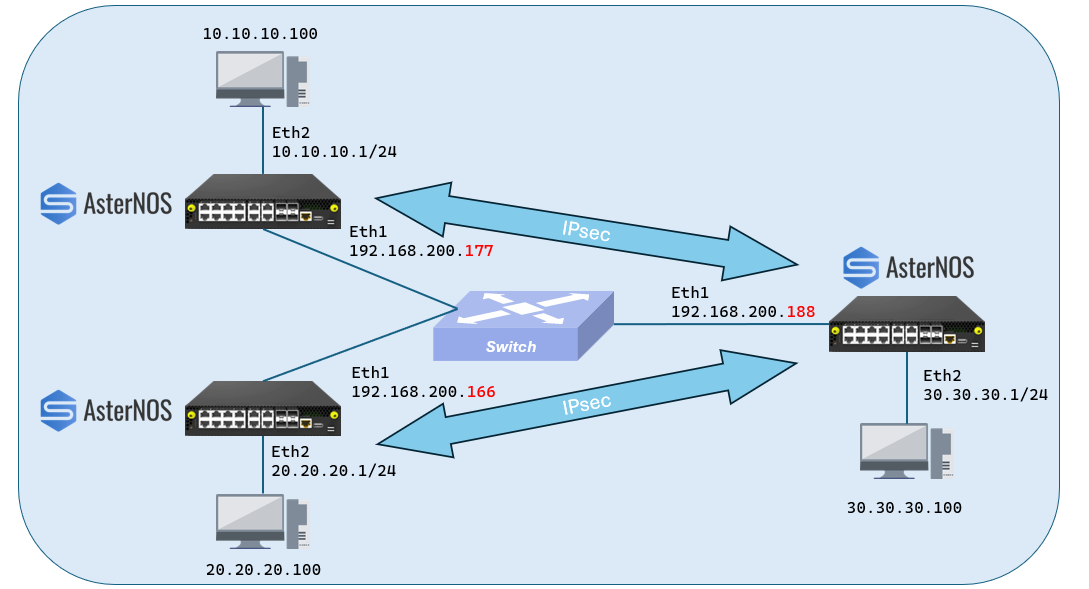
| Role | Device | WAN IP (Underlay) | LAN IP (Overlay) | Protected Subnet |
|---|---|---|---|---|
| Hub (HQ) | AsterNOS | 192.168.200.188 | 30.30.30.1 | 30.30.30.0/24 |
| Spoke 1 | AsterNOS | 192.168.200.166 | 20.20.20.1 | 20.20.20.0/24 |
| Spoke 2 | AsterNOS | 192.168.200.177 | 10.10.10.1 | 10.10.10.0/24 |
3. Configuration Steps
Section titled “3. Configuration Steps”Step 1: Initialize Hub Network (.188)
WANsonic(config)# interface ethernet 1sonic(config-if-1)# ip address 192.168.200.188/24sonic(config-if-1)# no shutdownsonic(config-if-1)# exit # LANsonic(config)# interface ethernet 2sonic(config-if-2)# ip address 30.30.30.1/24sonic(config-if-2)# no shutdownsonic(config-if-2)# exit # Routesonic(config)# ip route 0.0.0.0/0 192.168.200.1sonic(config)# exitStep 2: Configure Hub (Responder - .188)
Define two separate policies (one for each spoke) and bind both to the WAN interface.
--- Policy 1: For Spoke 1 ---sonic(config)# ipsec peer_spoke1sonic(config-ipsec-peer_spoke1)# shared_key_mic string test1234sonic(config-ipsec-peer_spoke1)# ike crypto_alg aes-cbc crypto_alg_size 256 integ_alg sha1-96 dh modp-2048sonic(config-ipsec-peer_spoke1)# ike local type ip4 data 192.168.200.188sonic(config-ipsec-peer_spoke1)# ike remote type ip4 data 192.168.200.166 # Selector: Hub (30.x) <-> Spoke 1 (20.x)sonic(config-ipsec-peer_spoke1)# ike traffic_selector local ip4 addr_start 30.30.30.0 addr_end 30.30.30.255sonic(config-ipsec-peer_spoke1)# ike traffic_selector remote ip4 addr_start 20.20.20.0 addr_end 20.20.20.255sonic(config-ipsec-peer_spoke1)# sa crypto_alg aes-cbc crypto_alg_size 256 integ_alg sha1-96sonic(config-ipsec-peer_spoke1)# sa tunnel ip4 src_ip 192.168.200.188 dst_ip 192.168.200.166 next_hop 192.168.200.166 remote_ip 20.20.20.0/24 shared_interface Ethernet1sonic(config-ipsec-peer_spoke1)# exit # --- Policy 2: For Spoke 2 ---sonic(config)# ipsec peer_spoke2sonic(config-ipsec-peer_spoke2)# shared_key_mic string test1234 # ... (Same crypto settings) ...sonic(config-ipsec-peer_spoke2)# ike local type ip4 data 192.168.200.188sonic(config-ipsec-peer_spoke2)# ike remote type ip4 data 192.168.200.177 # Selector: Hub (30.x) <-> Spoke 2 (10.x)sonic(config-ipsec-peer_spoke2)# ike traffic_selector local ip4 addr_start 30.30.30.0 addr_end 30.30.30.255sonic(config-ipsec-peer_spoke2)# ike traffic_selector remote ip4 addr_start 10.10.10.0 addr_end 10.10.10.255sonic(config-ipsec-peer_spoke2)# sa crypto_alg aes-cbc crypto_alg_size 256 integ_alg sha1-96sonic(config-ipsec-peer_spoke2)# sa tunnel ip4 src_ip 192.168.200.188 dst_ip 192.168.200.177 next_hop 192.168.200.177 remote_ip 10.10.10.0/24 shared_interface Ethernet1sonic(config-ipsec-peer_spoke2)# exitStep 3: Configure Spoke 1 (Initiator - .166)
1. Global Policysonic(config)# ipsec to_hubsonic(config-ipsec-to_hub)# shared_key_mic string test1234sonic(config-ipsec-to_hub)# ike crypto_alg aes-cbc crypto_alg_size 256 integ_alg sha1-96 dh modp-2048sonic(config-ipsec-to_hub)# ike local type ip4 data 192.168.200.166sonic(config-ipsec-to_hub)# ike remote type ip4 data 192.168.200.188sonic(config-ipsec-to_hub)# ike traffic_selector local ip4 addr_start 20.20.20.0 addr_end 20.20.20.255sonic(config-ipsec-to_hub)# ike traffic_selector remote ip4 addr_start 30.30.30.0 addr_end 30.30.30.255sonic(config-ipsec-to_hub)# sa crypto_alg aes-cbc crypto_alg_size 256 integ_alg sha1-96sonic(config-ipsec-to_hub)# sa tunnel ip4 src_ip 192.168.200.166 dst_ip 192.168.200.188 next_hop 192.168.200.188 remote_ip 30.30.30.0/24 shared_interface Ethernet1sonic(config-ipsec-to_hub)# exit # 2. Interface Binding (Trigger)sonic(config)# interface ethernet 1sonic(config-if-1)# ipsec to_hub peer ip4 192.168.200.188sonic(config-if-1)# exitStep 4: Configure Spoke 2 (Initiator - .177)
1. Global Policysonic(config)# ipsec to_hubsonic(config-ipsec-to_hub)# shared_key_mic string test1234sonic(config-ipsec-to_hub)# ike crypto_alg aes-cbc crypto_alg_size 256 integ_alg sha1-96 dh modp-2048sonic(config-ipsec-to_hub)# ike local type ip4 data 192.168.200.177sonic(config-ipsec-to_hub)# ike remote type ip4 data 192.168.200.188sonic(config-ipsec-to_hub)# ike traffic_selector local ip4 addr_start 10.10.10.0 addr_end 10.10.10.255sonic(config-ipsec-to_hub)# ike traffic_selector remote ip4 addr_start 30.30.30.0 addr_end 30.30.30.255sonic(config-ipsec-to_hub)# sa crypto_alg aes-cbc crypto_alg_size 256 integ_alg sha1-96sonic(config-ipsec-to_hub)# sa tunnel ip4 src_ip 192.168.200.177 dst_ip 192.168.200.188 next_hop 192.168.200.188 remote_ip 30.30.30.0/24 shared_interface Ethernet1sonic(config-ipsec-to_hub)# exit2. Interface Binding (Trigger)sonic(config)# interface ethernet 1sonic(config-if-1)# ipsec to_hub peer ip4 192.168.200.188sonic(config-if-1)# exit4. Verification
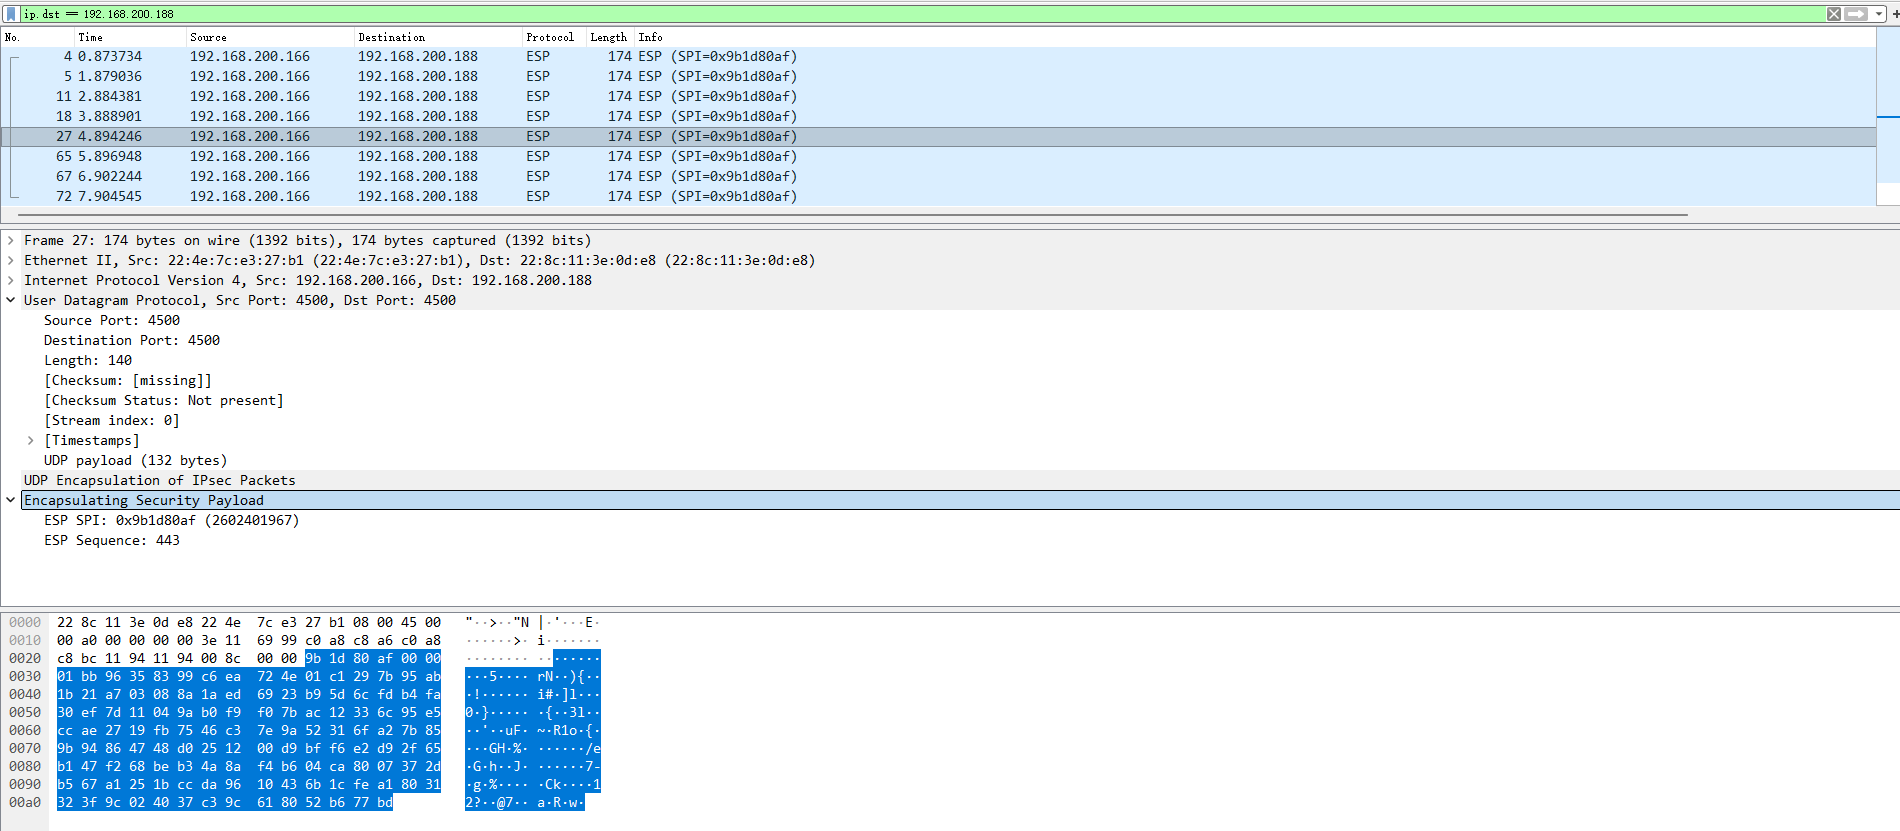
Section titled “4. Verification”We verify the multi-site connectivity by generating traffic from each Spoke to the Hub and analyzing the captured packets using Wireshark.
A. Traffic Generation
Initiate continuous UDP traffic from both Branch Offices to the Headquarters using iperf3 to generate a stable stream of encrypted packets.
1. From Spoke 1 (PC A):
## Send 10Mbps UDP traffic to Hub LAN (30.30.30.100)iperf3 -c 30.30.30.100 -u -b 10M -t 1002. From Spoke 2 (PC B):
## Send 10Mbps UDP traffic to Hub LAN (30.30.30.100)iperf3 -c 30.30.30.100 -u -b 10M -t 100B. Capture Analysis (Tunnel 1: Spoke 1 -> Hub)
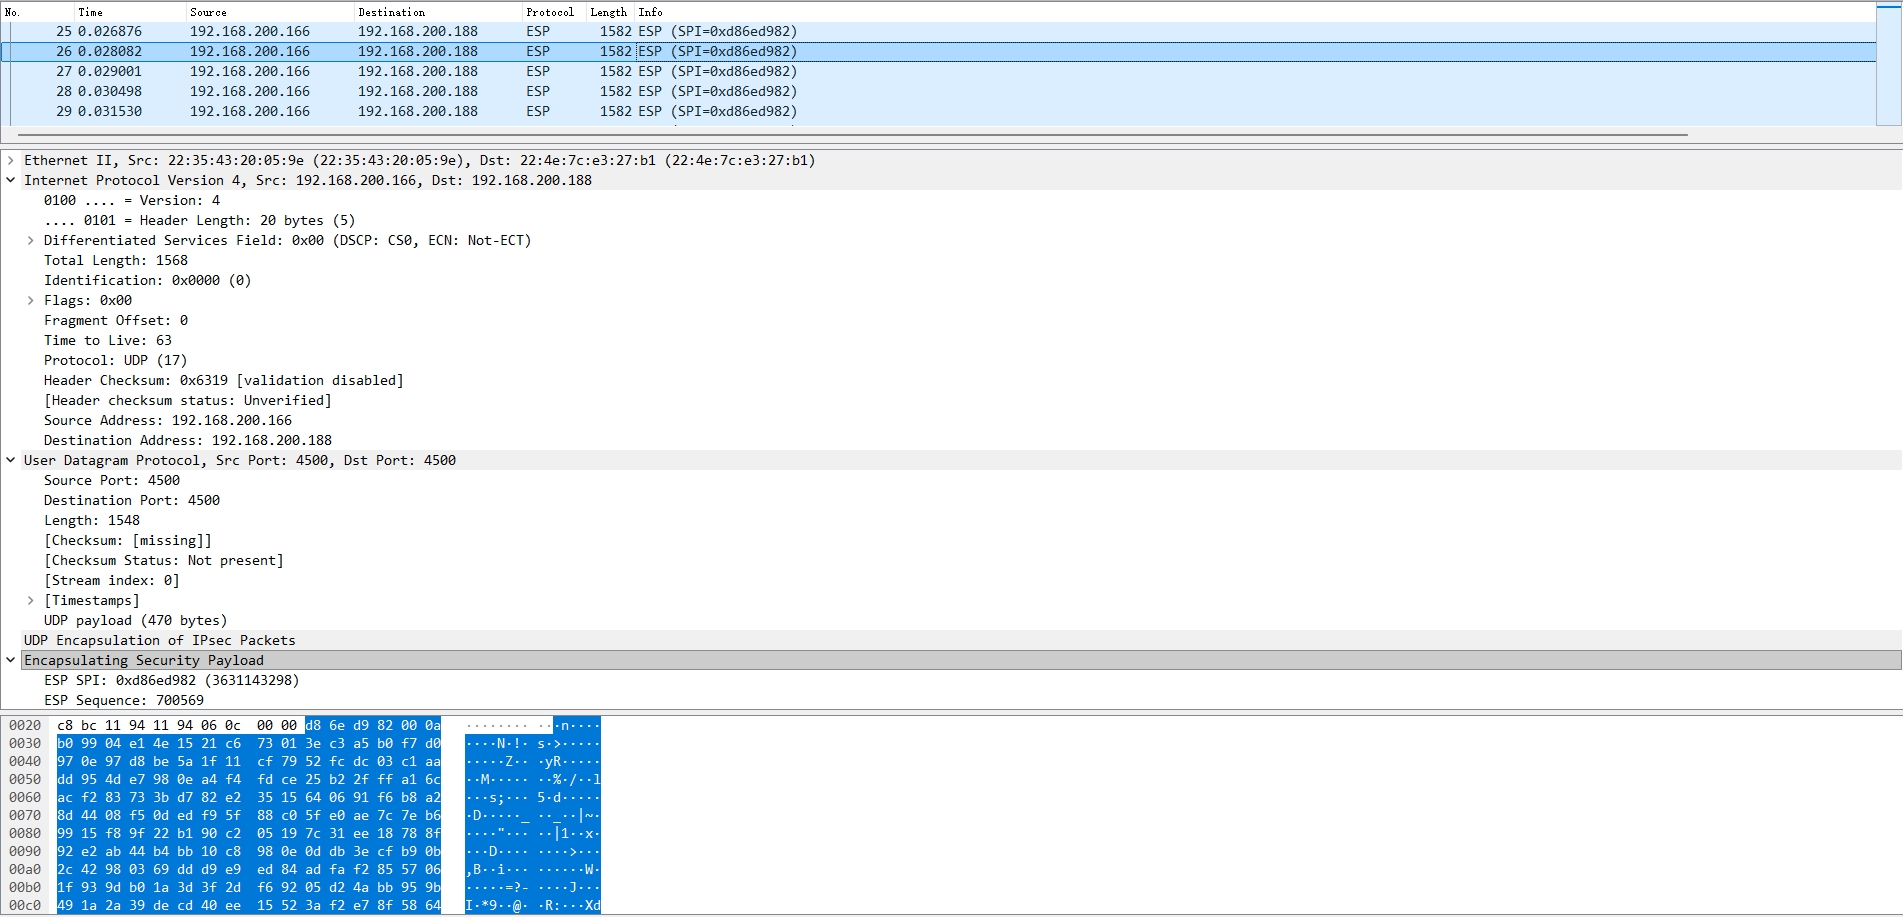
The screenshot below confirms that traffic from Spoke 1 (.166) is arriving at the Hub (.188) as encrypted ESP packets.
C. Capture Analysis (Tunnel 2: Spoke 2 -> Hub)
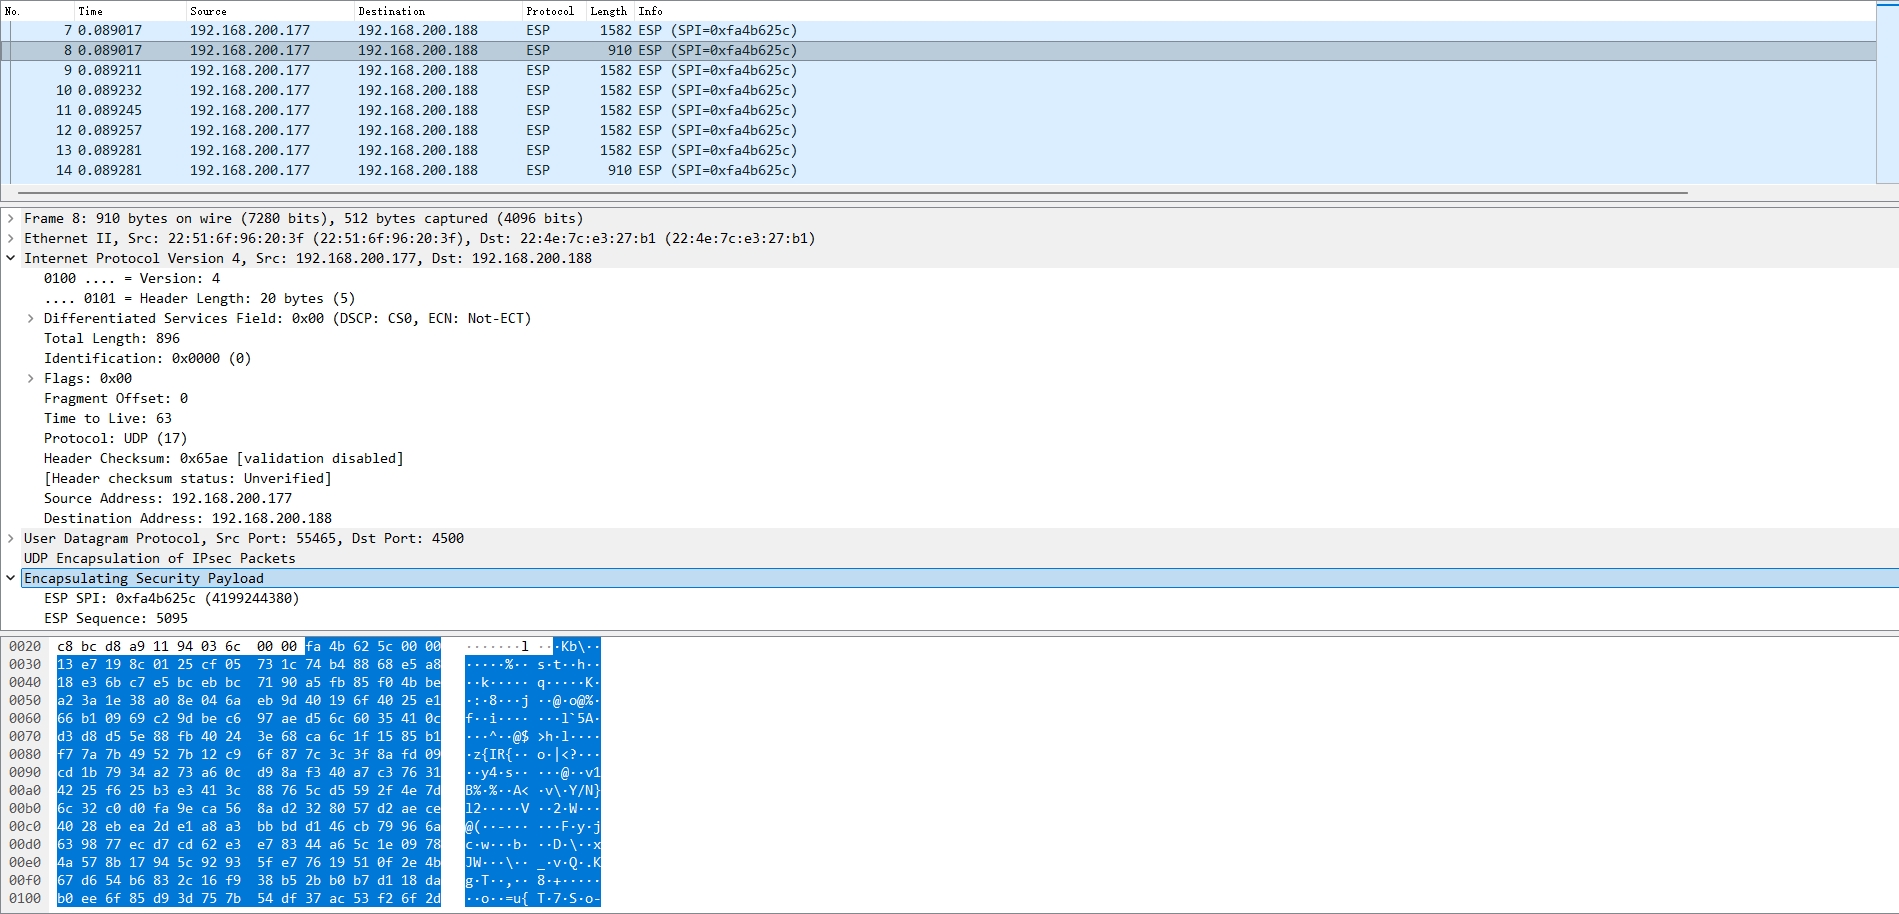
The screenshot below confirms that traffic from Spoke 2 (.177) is also arriving at the Hub (.188) as a distinct stream of encrypted ESP packets.
Scenario 3: NAT Traversal (NAT-T) with ID Masquerading
Section titled “Scenario 3: NAT Traversal (NAT-T) with ID Masquerading”1. Scenario Overview
Section titled “1. Scenario Overview”In this scenario, the Branch Gateway is deployed behind a NAT device (e.g., an ISP optical modem) and does not have a public IP address.
Key Configuration Strategy (ID Masquerading):
- Branch Side: The Branch Gateway “masquerades” its identity by claiming to be the NAT device’s Public IP (
.166) during IKE negotiation. - HQ Side: The HQ Gateway is configured to peer with the NAT device’s Public IP (
.166) directly.
2. Network Topology Plan (Linear Chain)
Section titled “2. Network Topology Plan (Linear Chain)”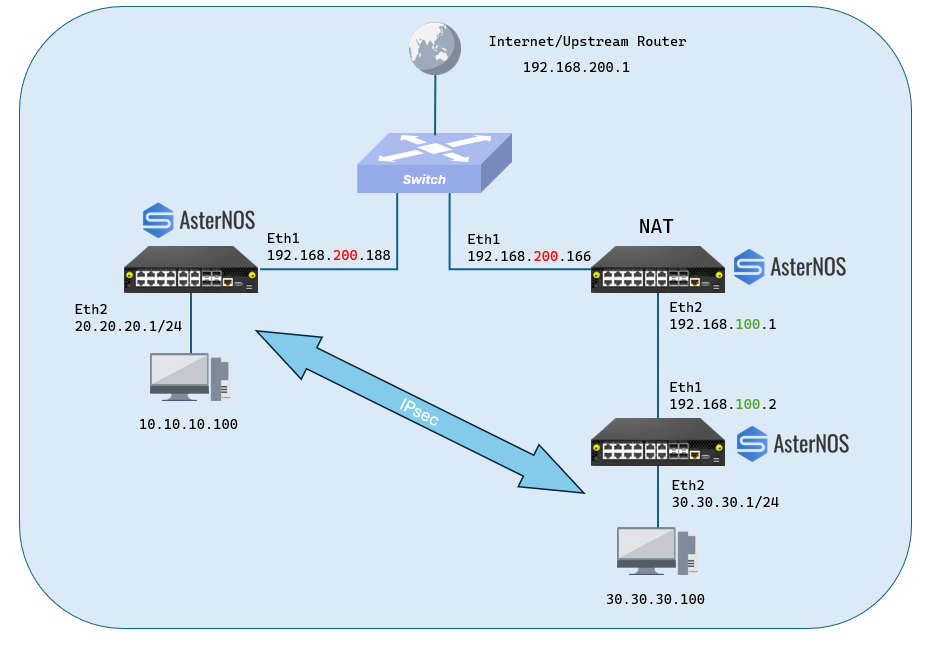
| Role | Device | Interface | IP Address | Function | Subnet Protected |
|---|---|---|---|---|---|
| HQ (Responder) | AsterNOS | Eth1 (WAN) | 192.168.200.188 | Public VPN Gateway | 10.10.10.0/24 |
| - | - | Eth2 (LAN) | 10.10.10.1 | Gateway for HQ PC | - |
| NAT Router | AsterNOS | Eth1 (WAN) | 192.168.200.166 | Simulates ISP Router | N/A |
| - | - | Eth2 (LAN) | 192.168.100.1 | Simulates LAN Gateway | - |
| Branch (Initiator) | AsterNOS | Eth1 (WAN) | 192.168.100.2 | Private IP (Behind NAT) | 30.30.30.0/24 |
| - | - | Eth2 (LAN) | 30.30.30.1 | Gateway for Branch PC | - |
3. Configuration Steps
Section titled “3. Configuration Steps”Step 1: Configure the Intermediate NAT Router (.166)
This device acts purely as a NAT router. It translates the Branch’s private IP (.100.x) to the Public WAN IP (.200.166).
1. Configure WAN Interface (Public)sonic(config)# interface ethernet 1sonic(config-if-1)# ip address 192.168.200.166/24sonic(config-if-1)# nat-zone 1sonic(config-if-1)# exit # 2. Configure LAN Interface (Private)sonic(config)# interface ethernet 2sonic(config-if-2)# ip address 192.168.100.1/24sonic(config-if-2)# exit # 3. Configure SNAT Rule # Translates all traffic from 192.168.100.0/24 to Public IP 192.168.200.166sonic(config)# nat pool pool1 192.168.200.166sonic(config)# nat binding bind1 pool1sonic(config)# nat enable # 4. Default Routesonic(config)# ip route 0.0.0.0/0 192.168.200.1sonic(config)# exitStep 2: Configure HQ Gateway (.188)
The HQ gateway is on the public network. It is configured to peer directly with the NAT device’s Public IP.
sonic(config)# ipsec from_branchsonic(config-ipsec)# shared_key_mic string test1234sonic(config-ipsec)# ike crypto_alg aes-cbc crypto_alg_size 256 integ_alg sha1-96 dh modp-2048 # Identity ConfigurationLocal: My Public IP (.188)sonic(config-ipsec)# ike local type ip4 data 192.168.200.188 # Remote: The NAT Device's PUBLIC IP (.166)HQ expects the peer to identify as .166sonic(config-ipsec)# ike remote type ip4 data 192.168.200.166 # Traffic Selector (Local: 10.x <-> Remote: 30.x)sonic(config-ipsec)# ike traffic_selector local ip4 addr_start 10.10.10.0 addr_end 10.10.10.255sonic(config-ipsec)# ike traffic_selector remote ip4 addr_start 30.30.30.0 addr_end 30.30.30.255 # SA Parameterssonic(config-ipsec)# sa crypto_alg aes-cbc crypto_alg_size 256 integ_alg sha1-96 # Tunnel Definitiondst_ip: Points to the physically reachable NAT Public IP (.166)next_hop: Points to the next hop gateway (or directly to .166 if L2 connected)sonic(config-ipsec)# sa tunnel ip4 src_ip 192.168.200.188 dst_ip 192.168.200.166 next_hop 192.168.200.166 remote_ip 30.30.30.0/24 shared_interface Ethernet1sonic(config-ipsec)# exitStep 3: Configure Branch Gateway (.100.2)
The Branch gateway is behind NAT. It must “masquerade” its Identity to match the HQ’s expectation.
sonic(config)# ipsec to_hqsonic(config-ipsec)# shared_key_mic string test1234sonic(config-ipsec)# ike crypto_alg aes-cbc crypto_alg_size 256 integ_alg sha1-96 dh modp-2048 # Identity ConfigurationLocal: MASQUERADED ID -> We claim to be the Public NAT IP (.166)sonic(config-ipsec)# ike local type ip4 data 192.168.200.166 # Remote: HQ Public IP (.188)sonic(config-ipsec)# ike remote type ip4 data 192.168.200.188 # Traffic Selector (Local: 30.x <-> Remote: 10.x)sonic(config-ipsec)# ike traffic_selector local ip4 addr_start 30.30.30.0 addr_end 30.30.30.255sonic(config-ipsec)# ike traffic_selector remote ip4 addr_start 10.10.10.0 addr_end 10.10.10.255 # SA Parameterssonic(config-ipsec)# sa crypto_alg aes-cbc crypto_alg_size 256 integ_alg sha1-96 # Tunnel Definitionsrc_ip: Must be the REAL Private IP (.100.2) to send packetsnext_hop: Points to the internal NAT Gateway (.100.1)sonic(config-ipsec)# sa tunnel ip4 src_ip 192.168.100.2 dst_ip 192.168.200.188 next_hop 192.168.100.1 remote_ip 10.10.10.0/24 shared_interface Ethernet1sonic(config-ipsec)# exit # Bind to WAN Interfacesonic(config)# interface ethernet 1sonic(config-if-1)# ipsec to_hq peer ip4 192.168.200.188sonic(config-if-1)# exit4. Verification
Section titled “4. Verification”Data Plane Verification (NAT-T Encapsulation)
Section titled “Data Plane Verification (NAT-T Encapsulation)”To confirm that NAT Traversal is functioning correctly, we perform a continuous ping from the Branch side (30.x) to the HQ side (10.x) and capture traffic at the NAT Device’s WAN Interface.
- Generate Traffic (Continuous Ping from Branch):
From a PC or the Gateway on the Branch side (subnet
30.30.30.0/24), ping a target IP on the HQ side (subnet10.10.10.0/24).
## From Branch PC (e.g., 30.30.30.100)ping 10.10.10.100 -t- Capture Packets (On NAT Device .166): Monitor traffic on the NAT Device’s WAN Interface (Ethernet 1).
Conclusion
Section titled “Conclusion”This guide demonstrates that AsterNOS is a robust IPsec VPN solution capable of handling Site-to-Site, Hub-and-Spoke, and NAT-T scenarios. The validated configurations prove that the Asterfusion ET2500 ensures secure, encrypted connectivity across complex topologies. Specifically, the successful NAT Traversal implementation confirms the gateway’s ability to reliably connect branch offices located behind ISP NAT devices.