
System Configuration Guide
Device Upgrade
Section titled “Device Upgrade”The device supports multiple methods to copy version images onto the target device for upgrading.
Copying Images Using
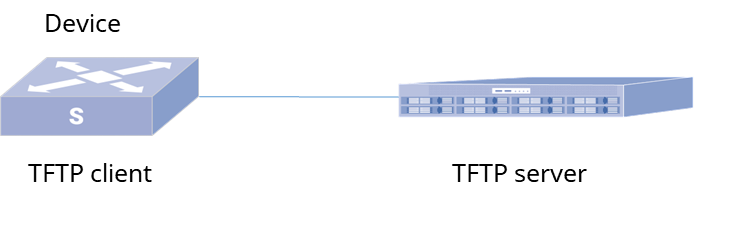
Section titled “Copying Images Using”In this scenario, the device and a file server establish communication. The device functions as a TFTP client, while the file server operates as a TFTP server. The objective is to download the version image stored on the server to the device, thereby accomplishing the software version upgrade.
1.Configure the IP address of the file server, ensuring that the file server and the device are routable.
2.Use the curl command to retrieve the version image from the TFTP server.
admin@sonic:~$ sudo curl -f -v -s -O tftp://192.168.2.165/AsterNOS1.0-R0100P00T18.bin* Trying 192.168.2.165:69...* getpeername() failed with errno 107: Transport endpoint is not connected* Connected to 192.168.2.165 () port 69 (#0)* getpeername() failed with errno 107: Transport endpoint is not connected* set timeouts for state 0; Total 300000, retry 6 maxtry 50* got option=(tsize) value=(928851950)* tsize parsed from OACK (928851950)* got option=(blksize) value=(512)* blksize parsed from OACK (512) requested (512)* got option=(timeout) value=(6)* Connected for receive* set timeouts for state 1; Total 0, retry 72 maxtry 50* Closing connection 0admin@sonic:~$ lsAsterNOS1.0-R0100P00T18.binCopying Images Using SCP
Section titled “Copying Images Using SCP”
1.Configure the IP address of the file server to ensure that the file server and the device are reachable via routing.
2.On the device, use the SCP command to complete the download of the version image.
admin@sonic:~$ sudo scp server@192.168.0.100:/share/ AsterNOS-V5.2R001.binadmin@sonic:~$ lsAsterNOS-V5.2R001.binCopying Images Using a USB Drive
Section titled “Copying Images Using a USB Drive”This method is suitable when there is no network environment available, and you need to copy the version image to the device. Typically, the USB port of the device is located on the front panel.
1.Insert the USB drive containing the system image into the device’s USB port.
2.Execute a command to view the disk name corresponding to the USB drive:
admin@sonic:~$ sudo /sbin/fdisk -l3.Create a directory for mounting the USB drive.
admin@sonic:~$ sudo mkdir /mnt/usb/4.Mount the USB drive. Take the example of /dev/sdb4 as the path for the USB drive, but please adjust according to the actual situation.
admin@sonic:~$ sudo mount /dev/sdb4 /mnt/usb5.Navigate to the directory of the mounted disk and copy files from the disk to the device.
admin@sonic:~$ cd /mnt/usbadmin@sonic:/mnt/usb/$ sudo cp AsterNOS-V5.2R001.bin /home/adminadmin@sonic:~$ lsAsterNOS-V5.2R001.binExecuting the Upgrade Command
Section titled “Executing the Upgrade Command”| Operation | Command | Description |
|---|---|---|
| Execute the upgrade command | image update image-name | Upgrade package storage path:/home/admin. If a configuration upgrade is required, please execute the “write” command to save the configuration before proceeding with the upgrade. Once the upgrade is completed without any errors, you’ll need to manually restart the device to switch to the new version |
| Display the version | show version | - |
ZTP Configuration
Section titled “ZTP Configuration”Introduction
Section titled “Introduction”Zero Touch Provisioning (ZTP) refers to the automatic loading of initialization files (configuration files, upgrade files) on newly manufactured or blank devices when they are powered on. This functionality enables devices to be deployed and configured without requiring on-site manual configuration. As a result, ZTP reduces labor costs and enhances deployment efficiency.
Principle Explanation
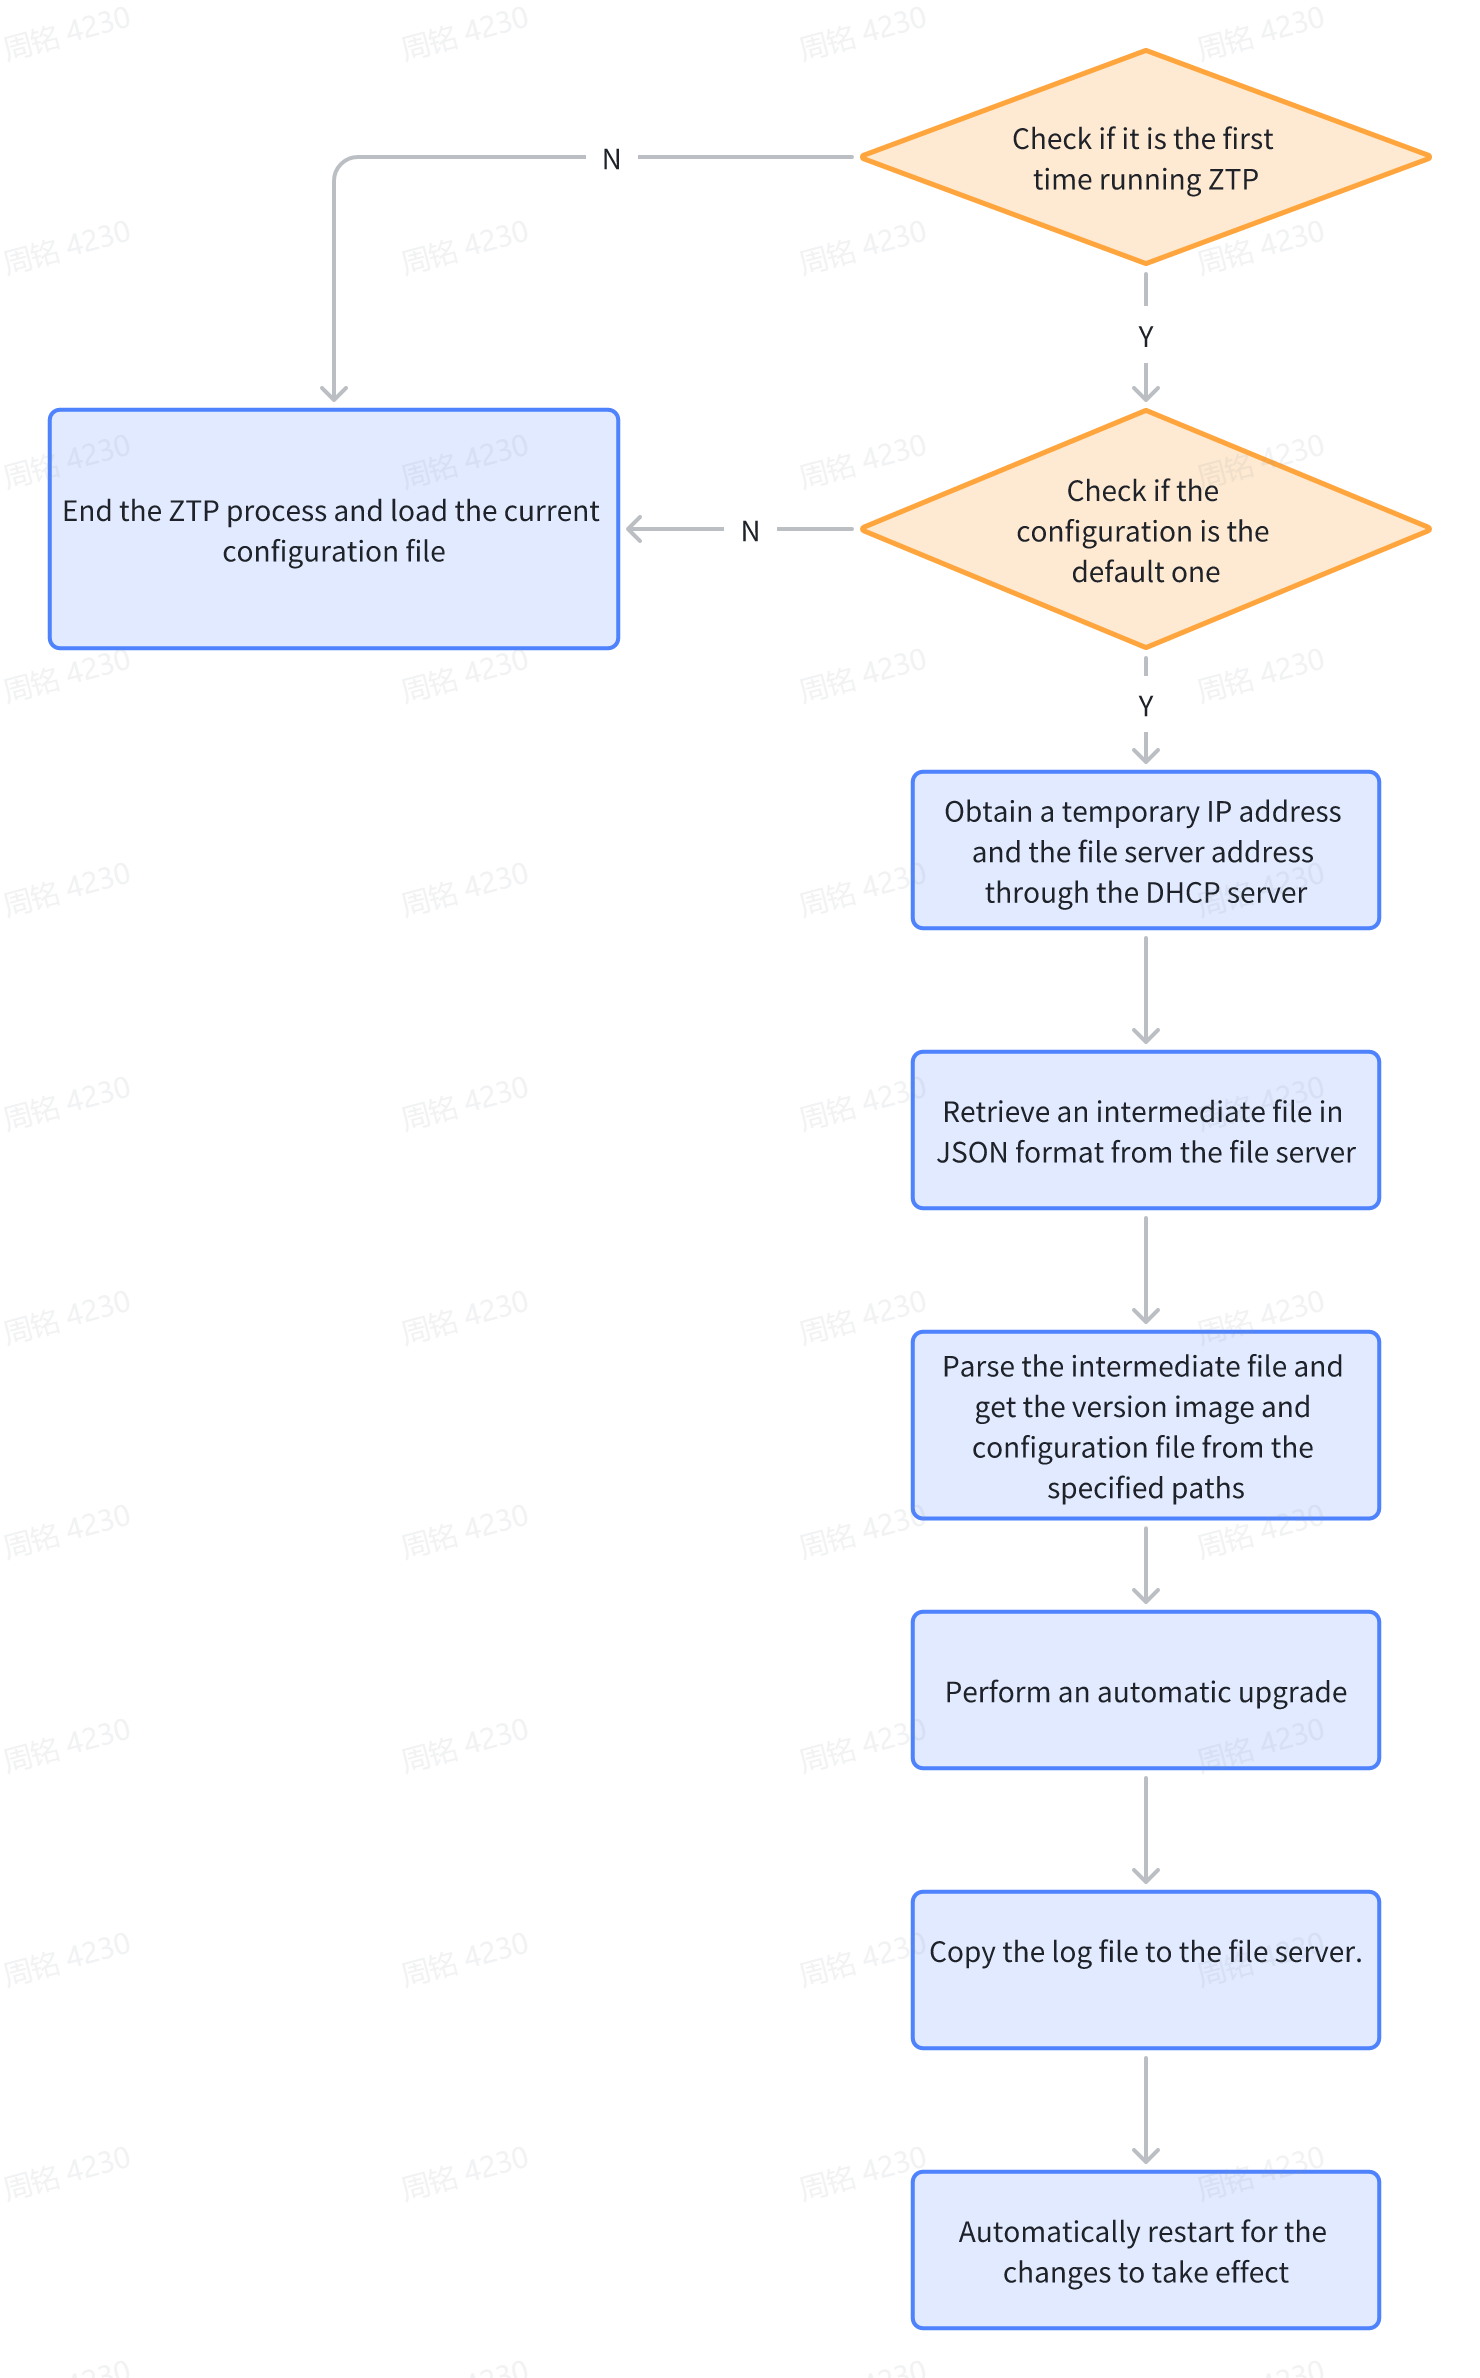
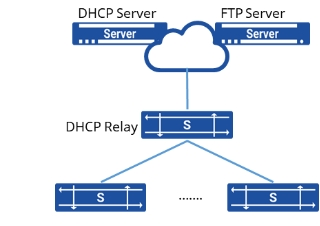
Section titled “Principle Explanation”As illustrated in the diagram, a device awaiting configuration is connected to a DHCP relay device via its service port or management port. Upon powering on, the device checks whether a ZTP initialization process has been carried out. If yes, it loads the system configuration files and starts the device. If not, the device enters the ZTP initialization process through DHCP.
During this process, the device operates as a DHCP client and sends DHCP request packets to the DHCP server to obtain an IP address and the path to the required upgrade files. Based on the configuration information carried in the received DHCP response packet, the device automatically retrieves version and configuration files from the specified file server. It then proceeds to execute the upgrade command and reboot the device.
Upon completion of the device reboot, automatic loading of both the version and configuration is achieved.
- DHCP Server: Used to assign temporary management IP addresses to devices and provide the file server address.
- TFTP/FTP Server: Stores the configuration files, version images required for ZTP initialization, and user logs after upgrades are completed.
- DHCP Relay: When the device to be upgraded and the DHCP Server are in different network segments, a relay device is needed to forward DHCP packets.
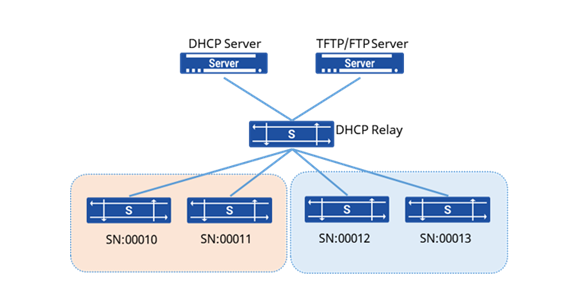
Devices can carry their hardware model and serial number in the packets. TFTP/FTP servers can name version files based on hardware models and name configuration files based on serial numbers, enabling provision of different versions and independent configuration files for devices of various models and serial numbers.
The workflow of ZTP is illustrated in the diagram below:
Configuring the DHCP Server
Section titled “Configuring the DHCP Server”The DHCP server passes network configuration parameters to the device through the Option field. When the device to be configured is not on the same subnet as the DHCP server, a DHCP relay needs to be configured to forward DHCP interaction messages.
When the device enters the ZTP process, both the management port and service port of the device will send DHCPv4 Discover messages, carrying option 67 to request the path to the intermediate file required for provisioning.
| Option Number | Function |
|---|---|
| Option 1 | Sets the subnet mask for the IP address |
| Option 3 | Sets the gateway for the DHCP client |
| Option 6 | Sets the IP address of the DNS server |
| Option 67 | Sets the path to the intermediate file. Such as: ftp://ftpserver:test@192.168.0.10/ztp.json |
Configuring the File Server
Section titled “Configuring the File Server”The file server is used to store the files that need to be transferred during the ZTP process, including intermediate files, image files, configuration files, and logs. Generally, a third-party server is used as the file server, and during deployment, the network connectivity between the file server and the device must be ensured. The file server supports TFTP and FTP servers.
Place the intermediate file and other provisioning files in the working directory of the file server and rename the files as specified:
- Image File: The name should be the device type followed by .bin.
- Configuration File: The name should be the device serial number (SN) followed by .bin. For example, if the device SN is F020000A055, the configuration file name should be F020000A055.bin.
- Intermediate File: The file must be named exactly ztp.json.
- Logs: Logs generated by the device during the ZTP process will be uploaded to the file server after the ZTP process is completed or if it fails for some reason, to facilitate troubleshooting.
Preparing the Configuration File
Section titled “Preparing the Configuration File”ZTP provisioning requires the pre-preparation of provisioning files, including the configuration file and the intermediate file.
The configuration file is in .json format, which the device loads to generate the configuration after startup. The configuration file can be manually written or copied from another device.
To save the configuration file, execute the write command on the device. The configuration file is saved in the /etc/sonic/ directory of the device, named in the format config_db_*.json. Then, export the configuration file using SCP or other methods.
It is important to note that the configuration file must be written strictly in JSON format and comply with the device’s requirements for the configuration file content. It is recommended that users export the configuration file and modify it as needed, rather than writing the configuration file directly.
Preparing the Intermediate File
Section titled “Preparing the Intermediate File”The intermediate file is used to inform the device about the paths of the version image and configuration file to be fetched, as well as the path where the log files generated during the ZTP process need to be uploaded. The file must be named ztp.json.
{"ztp": {"01-configdb-json": {"dynamic-url": {"source": {"prefix": "tftp://199.0.0.1/","identifier": "product-name","suffix": ".json"},"destination":"/etc/sonic/config_db.json"},"save-config":false},"02-firmware": {"install": {"dynamic-url": {"source": {"prefix": "tftp://199.0.0.1/","identifier": "AsterNOS1.0-R0100P00T17","suffix": ".bin"}},"set-default": true}}"03-upload-log": {"dynamic-upload-url": {"destination":{"prefix": "tftp://199.0.0.1/","identifier":"product-name","suffix": ".LOG"}},"reboot-on-success": true}}}Field Meanings
| Field | Meaning | |
|---|---|---|
| configdb-json | prefix | The absolute path of the configuration file. |
| - | identifier | The configuration file name. When the field content is serial-number, it indicates that the field will be automatically filled with the device’s SN code. If there is no need to distinguish between different devices, a fixed configuration file name can be used. |
| - | suffix | The file format, which must be .json for configuration files. |
| firmware | prefix | The absolute path of the image file. |
| - | identifier | The image file name. When the field content is product-name, it indicates that the field will be automatically filled with the device type. If there is no need to distinguish between device types, a fixed name can be used. |
| - | suffix | The file format, which must be .bin for image files. |
| upload-log | prefix | The specified path for uploading logs to the file server. |
| - | identifier | The log file name. |
| - | suffix | The log file format. |
| set-default | Set the image as the default to be loaded at startup. | |
| reboot-on-success | Automatically reboot the device after the ZTP process is completed successfully. |
Configuration Example
Section titled “Configuration Example”Network requirements
Section titled “Network requirements”A certain company has multiple devices that need to be deployed in bulk, upgraded, and configured. To save on human resources and streamline the process, they plan to use zero-touch provisioning for deployment.
Procedure
Section titled “Procedure”1.Configure the DHCP Server and add an option field to configure the FTP server address.
option bootfile-name ”tftp://199.0.0.1/ztp.json”2.Create a ZTP file in the /ftpboot directory of the FTP server, and provide directory information for the required files during the ZTP process.
{"ztp": {"01-configdb-json": {"dynamic-url": {"source": {"prefix": "tftp://199.0.0.1/","identifier": "product-name","suffix": ".json"},"destination":"/etc/sonic/config_db.json"},"save-config":false},"02-firmware": {"install": {"dynamic-url": {"source": {"prefix": "tftp://199.0.0.1/","identifier": "AsterNOS1.0-R0100P00T17","suffix": ".bin"}},"set-default": true}}"03-upload-log": {"dynamic-upload-url": {"destination":{"prefix": "tftp://199.0.0.1/","identifier":"product-name","suffix": ".LOG"}},"reboot-on-success": true}}}3.Upload the required files to the directory specified in the ztp.json file on the FTP server.
Verify configuration
Section titled “Verify configuration”After device reboot, view device version and configuration
sonic# show versionsonic# show running-config