
DHCP Configuration Guide
Introduction
Section titled “Introduction”Dynamic Host Configuration Protocol (DHCP) is a technology used for centralized dynamic management and configuration of user IP addresses. DHCP belongs to the TCP/IP protocol, defined by RFC 2131, and adopts a client/server communication mode. The client (DHCP Client) submits a configuration request to the server (DHCP Server), and the server returns the configuration information assigned to the client. It is usually applied in large local area network environments, mainly for centralized management and allocation of IP addresses, enabling hosts in the network environment to dynamically obtain information such as IP addresses, Gateway addresses, DNS server addresses, etc., and can improve address utilization. However, users do not need to equip a DHCP server on every network. When the DHCP client and DHCP server are not in the same network segment, DHCP Relay can be configured on the corresponding device to forward DHCP messages between the DHCP server and DHCP client, helping clients without IP addresses to obtain IP across network segments while avoiding the problem of too many DHCP servers.
Basic Concepts
Section titled “Basic Concepts”DHCP server
Section titled “DHCP server”The DHCP server is mainly responsible for selecting idle IP addresses from the IP address pool to allocate to DHCP clients, and can also provide network parameters for DHCP clients, such as gateway addresses, TFTP server addresses, etc. Ability to manage IP address leases, track and manage IP address lease terms, avoid address conflicts, and promptly recover and reassign IP addresses released by DHCP clients.
DHCP client
Section titled “DHCP client”DHCP clients mainly send DHCP requests to the network, obtaining information such as IP addresses and network parameters through the DHCP protocol.
DHCP relay
Section titled “DHCP relay”DHCP relay is mainly responsible for forwarding DHCP messages between DHCP servers and DHCP clients, assisting DHCP servers in dynamically allocating network parameters to DHCP clients, and realizing the forwarding of DHCP messages in different network segments.
Address pool
Section titled “Address pool”An address pool is a collection of all IP addresses that DHCP servers can allocate to clients. In addition to IP addresses, the address pool can also be configured with network parameters such as lease term, subnet mask, default gateway, etc.
Lease time
Section titled “Lease time”When the DHCP server assigns an IP address to a client, it also sets a usage period for the client, which is the lease term. Before the lease term expires, if the client still needs to continue using this IP address, it will initiate a renewal request to renew the lease. If it is no longer needed, it will actively release the IP address after reaching the lease term. The DHCP server will retrieve the IP address released by the client and put it back into the address pool for reuse.
Class and option-group
Section titled “Class and option-group”Currently, it supports assigning specific IP addresses and network parameters based on certain user information. User class is to create matching conditions, match this type of user information, binds the address pool after matching, and allocate IP addresses. Currently, it only supports matching the remote ID and circuit ID of option 82, as well as option 93, which is the system architecture information of the client. The option group is to assign specific network parameters to users matched on the user class.
DHCP option
Section titled “DHCP option”The option in DHCP messages is used to transmit control information and network configuration parameters, enabling dynamic address allocation while providing clients with richer network configuration information. The range of DHCP Options is 1-255, and common DHCP options are shown in the following table:
Table 1 DHCP Options
| Option ID | Option Content |
|---|---|
| 1 | Subnet Mask |
| 3 | Gateway address |
| 6 | DNS server address |
| 43 | Manufacturer customization |
| 50 | IP address options requested by the client |
| 51 | Lease time |
| 53 | DHCP message type |
| 55 | Request a list of options. The client uses this option to indicate which network configuration parameters need to be obtained from the server. The content of this option is the option value corresponding to the parameter requested by the client |
| 60 | Manufacturer identification, the client uses this option to identify the manufacturer to which they belong |
| 61 | Client Identifier |
| 66 | TFTP server |
| 67 | Bootfile |
| 82 | DHCP relay info |
Basic Principle
Section titled “Basic Principle”We will introduce the process of obtaining an IP address for a DHCP client for the first time in both scenarios without and with DHCP relay.
No DHCP Relay scene
Section titled “No DHCP Relay scene”When the DHCP client and DHCP server are in the same network segment, DHCP packets do not need to be forwarded through DHCP relays.
- When a DHCP client first joins the network, it sends a DHCP Discover broadcast message to all devices in the network, searching for available DHCP server information.
- After receiving the DHCP address request from the client, the DHCP server selects an unallocated IP from the IP address pool and sends a DHCP OFFER packet to the DHCP client. The OFFER packet contains IP address, lease information, server information, and other content.
- After receiving the OFFER packet, the DHCP client sends a REQ broadcast packet to the DHCP server. The REQ packet contains information about the DHCP server and the IP address to be assigned, formally requesting the assigned IP address from the server. If there are multiple DHCP servers and DHCP clients responding to DHCP OFFER messages, the DHCP client generally only receives the first DHCP OFFER message received.
- After receiving the REQ message, the DHCP server determines whether the DHCP server information in the REQ message is its own. If it is not, it discards the message. If it is, it sends an ACK confirmation message to the client to obtain the IP address.
DHCP relay scene
Section titled “DHCP relay scene”When the DHCP client and DHCP server are in different network segments, DHCP packets need to be forwarded through DHCP relays.
- When a DHCP client first joins the network, it sends a DHCP Discover broadcast message requesting an IP address.
- After receiving the Discover request message initiated by the client, the DHCP relay changes the destination IP address in the message to the address of the DHCP server, changes the source address of the message to the address of the DHCP relay, and then sends the DHCP Discover message to the server in unicast form.
- After receiving the DHCP Discover message, the DHCP server assigns parameters such as IP address to the client and then sends a DHCP OFFER message to the DHCP relay unicast.
- After receiving the OFFER message sent by the server, the DHCP relay will forward it to the DHCP client.
- After receiving the OFFER message, the DHCP client will send the DHCP REQ message to the DHCP relay in broadcast form. After receiving the REQ message, the DHCP relay will also forward it to the DHCP server in unicast form.
- After receiving the REQ message, the DHCP server replies with an ACK message to the DHCP relay, and the relay device forwards it to the DHCP client.
- After receiving the ACK confirmation message, the DHCP client obtains the IP address.
DHCP Configuration
Section titled “DHCP Configuration”DHCP Default Setting
Section titled “DHCP Default Setting”Table 2 DHCP Default Setting
| Parameter | Default value |
|---|---|
| DHCP | Disable |
| Deafult lease time | 600s |
| Max lease time | 7200s |
| giaddr address | Downlink VLAN IP |
Enable DHCP feature
Section titled “Enable DHCP feature”Before configuring a DHCP server or DHCP relay, the DHCP feature needs to be enabled first.
Table 3 Enable DHCP feature
| Purpose | Commands | Description |
|---|---|---|
| Enter global configuration view. | configure terminal | - |
| Enable DHCP function | feature dhcp state enable | - |
Configure the device as a DHCP server
Section titled “Configure the device as a DHCP server”Enable DHCP server function
Section titled “Enable DHCP server function”Table 4 Configure Enable DHCP server function
| Purpose | Commands | Description |
|---|---|---|
| Enter global configuration view | configure terminal | - |
| Enter Ethernet interface or VLANIF configuration view | interface [ethernet interface-name|vlan vlan-id] | - |
| Enable the DHCP Server function of the interface | dhcp server | - |
Configure address pool
Section titled “Configure address pool”Table 5 Configure address pool
| Purpose | Commands | Description |
|---|---|---|
| Enter global configuration view. | configure terminal | - |
| Create DHCP Server address pool and enter DHCP pool configuration view | dhcp pool name | - |
| Configure the network segment of the address pool | network A.B.C.D/M | - |
| Configure address pool IP range | address-pool start_ip end_ip | The end_ip needs to be after the start_ip |
Configure options
Section titled “Configure options”Table 6 Configure options
| Purpose | Commands | Description |
|---|---|---|
| Enter global configuration view. | configure terminal | - |
| Enter DHCP pool configuration view | dhcp pool name | - |
| Configure lease time | lease-time default_time max_time | - |
| Configure bootfile option | bootfile name | - |
| Configure DNS Option | dns A.B.C.D | - |
| Configure next server Option | next-server A.B.C.D | - |
| Configure tftp server Option | tftp-server A.B.C.D | - |
| Configure capwap-ac Option | capwap-ac A.B.C.D | - |
| Configure routers Option | routers A.B.C.D | - |
| Configure option43 | option43 hex value force | - |
Configure address allocation strategy
Section titled “Configure address allocation strategy”Table 7 Configure address allocation strategy
| Purpose | Commands | Description |
|---|---|---|
| Enter global configuration view. | configure terminal | - |
| Create DHCP Server user class and enter DHCP user class configuration view | dhcp class name | - |
| Create a DHCP Server option group and enter the option group configuration view | dhcp option-group id | - |
| Create user class matching rules | if-match rule rule_id option option_id | Only support option82 and option93 |
| Configure user class address range | class name address-pool start_ip end_ip | - |
| Bind user classes and option groups | class name option-group id | - |
Configure DHCP server failover
Section titled “Configure DHCP server failover”Table 8 Configure DHCP server failover
| Purpose | Commands | Description |
|---|---|---|
| Enter global configuration view. | configure terminal | - |
| Enable DHCP Server dual machine hot standby | dhcp failover name | - |
| Configure local IP address | address {A.B.C.D|loopback 0} | - |
| Configure peer IP address | peer address A.B.C.D | - |
| Configure peer offline time | auto-partner-down time | - |
| Configure maximum communication interruption time | max-response-delay time | - |
| Configure primary and secondary roles | role {primary|secondary} | - |
Configure the device as a DHCP relay
Section titled “Configure the device as a DHCP relay”Configure DHCP relay
Section titled “Configure DHCP relay”Table 9 Configure DHCP relay
| Purpose | Commands | Description |
|---|---|---|
| Enter global configuration view. | configure terminal | - |
| Create DHCP relay and enter configuration view. | dhcp-relay name v4 | - |
| Configure DHCP relay downlink VLAN. | downlink vlan vlan_id | The downlink is the port connected to the client |
| Configure DHCP relay uplink. | uplink {ethernet|link-aggregation|vlan} interface-name | The uplink is the port connected to the server |
| Configure DHCP server address. | server {A.B.C.D} | - |
Configure giaddr
Section titled “Configure giaddr”Giaddd (Gateway IP Address) is a field in the DHCP protocol primarily used to identify the IP address of a relay agent. By default, the giaddr address is the IP address of the downstream VLAN. When the DHCP server receives a DHCP packet, it will allocate an IP address to the client from the correct address pool based on the network segment where the giaddr address is located.
Table 10 Configure giaddr
| Purpose | Commands | Description |
|---|---|---|
| Enter global configuration view. | configure terminal | - |
| Create DHCP relay and enter configuration view. | dhcp-relay name v4 | - |
| Configure giaddr. | downlink vlan vlan_id giaddr A.B.C.D | - |
Configure option82
Section titled “Configure option82”Option82 sub5 is a sub option of the relay agent information option in DHCP packets, which is a link selection sub item. When assigning IP addresses to DHCP clients, the DHCP server can allocate IP addresses in the same network segment as the address based on this IP address, which helps to achieve more accurate address allocation strategies. When there are multiple IP addresses in the current VLAN, option82_stub5 can be manually configured to be one of the IP addresses in the specified network segment, thereby controlling the client to obtain the IP address of the specified network segment. After configuring option82_stub5, the DHCP server will allocate an IP based on the option82_stub5 address network segment and search for a route to the relay based on giaddr.
Table 11 Configure option82
| Purpose | Commands | Description |
|---|---|---|
| Enter global configuration view. | configure terminal | - |
| Create DHCP relay and enter configuration view | dhcp-relay name v4 | - |
| Configure the sub5 address of option85 | downlink vlan vlan_id option82_sub5 A.B.C.D | - |
Display and Maintenance
Section titled “Display and Maintenance”Table 12 DHCP Display and Maintenance
| Purpose | Commands | Description |
|---|---|---|
| Display the address pool information of DHCP servers | show dhcp pool info ip-version v4 | - |
| Display the addresses allocated by the DHCP server | show dhcp pool ip-in-use ip-version v4 | - |
| Display DHCP server reclaimed addresses | show dhcp pool expired ip-version v4 | - |
| Display DHCP server user class configuration | show dhcp class | - |
| Display DHCP Server Options Group Configuration | show dhcp option-group | - |
| Display DHCP relay configuration information | show dhcp_relay | - |
Typical Configuration Example
Section titled “Typical Configuration Example”Configure the device as a DHCP server
Section titled “Configure the device as a DHCP server”- Networking Requirements An efficient IP address management mechanism is needed within a certain enterprise to enable all internal terminals to dynamically obtain valid IP addresses, while avoiding IP conflicts and address waste. DHCP servers need to be configured to automatically allocate IP addresses, reducing the workload of manual configuration and improving the automation level of network management.
- Topology
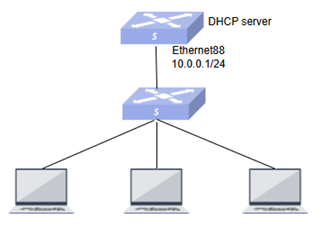
- Configuration steps
#Enable the interface DHCP server function on the DHCP server.
sonic# configuresonic(config)# interface ethernet 0/88sonic(config-if-0/88)# dhcp serversonic(config-if-0/88)# exit#Configure interface IP address
sonic# configuresonic(config)# interface ethernet 0/88sonic(config-if-0/88)# ip address 10.0.0.1/24sonic(config-if-0/88)# exit#Create DHCP address pool, configure address pool IP information, configure network segment and other network parameter information
sonic# configuresonic(config)# dhcp pool test1sonic(config-dhcp-pool-test1)# network 10.0.0.1/24sonic(config-dhcp-pool-test1)# address-pool 10.0.0.10 10.0.0.200sonic(config-dhcp-pool-test1)# lease-time 1200 2000- Verify configuration
#show dhcp server configuration
sonic# show dhcp pool info--------------------------------------------------Pool-name : test1Network : 10.0.0.0Mask : 255.255.255.0Lease : 10.0.0.10 - 10.0.0.200Lease_default_time : 600Lease_max_time : 7200After each PC goes online, it will initiate an IP address request and successfully obtain the IP address of the 10.0.0.0/24 network segment.
Configure the device as a DHCP relay
Section titled “Configure the device as a DHCP relay”- Networking Requirements A large enterprise has multiple office areas and departments, each located in a different subnet. To simplify network management, the enterprise has decided to deploy a DHCP server in the core network and ensure that clients in each subnet can successfully obtain IP addresses through DHCP relays.
- Topology

- Different subnets require different address pool information to be configured on the DHCP server. Taking one subnet configuration as an example, the configuration steps are as follows.
A. Configure DHCP server information.
#Enable the DHCP server interface function on the DHCP server device and configure the interface IP address
sonic# configuresonic(config)# interface ethernet 0/88sonic(config-if-0/88)# dhcp serversonic(config-if-0/88)# ip address 100.0.0.1/24#Configure static routing to make the IP address assigned by the server reachable to the relay
sonic# configuresonic(config)# ip route 10.0.0.2/24 100.0.0.2#Create DHCP address pool and configure network parameter information
sonic# configuresonic(config)# dhcp pool test1sonic(config-dhcp-pool-test1)# network 10.0.0.1/24sonic(config-dhcp-pool-test1)# address-pool 10.0.0.10 10.0.0.200sonic(config-dhcp-pool-test1)# lease-time 600 1000sonic(config-dhcp-pool-test1)# exitB. Configure DHCP relay.
#Configure the IP address for the interface connected to the server
sonic# configuresonic(config)# interface ethernet 0/60sonic(config-if-0/60)# ip address 100.0.0.2/24#Create a downstream VLAN and configure an IP address in the same network segment as the subnet
sonic# configuresonic(config)# vlan 100sonic(config-vlan-100)# exitsonic(config)# interface vlan 100sonic(config-vlanif-100)# ip address 10.0.0.2/24sonic(config-vlanif-100)# exit#Create DHCP relay and configure relay information
sonic# configuresonic(config)# dhcp-relay t1 v4sonic(config-dhcp-relay-t1)# downlink vlan 100sonic(config-dhcp-relay-t1)# uplink ethernet 0/60sonic(config-dhcp-relay-t1)# server 100.0.0.1sonic(config-dhcp-relay-t1)# exit- Verify configuration
#show DHCP relay configuration
sonic# show dhcp_relay+------------+-------------+------------+------------+-----------+-------+| Name | down link | up link | loopback | server | vrf |+============+=============+============+============+===========+=======+| t1__v4(v4) | vlan100 | 0/60 | NA | 100.0.0.1 | NA |+------------+-------------+------------+------------+-----------+-------+When a PC device in the 10.0.0.0/24 network segment goes online, it will automatically obtain an IP address.