
Security Configuration Guide
Introduction
Section titled “Introduction”AAA is the abbreviation of Authentication, Authorization and Accounting, which is a security management mechanism for access control in network security, providing three kinds of security services: authentication, authorization and accounting.
Description of Principle
Section titled “Description of Principle”AAA provides the following three security services.
Authentication
Authentication: The user’s identity is verified to determine if he or she is a legitimate user. The entire authentication is usually performed by reviewing the user’s entered username and password for permissions. The principle of authentication is that each user has a unique permission acquisition criteria. The AAA server checks the user’s criteria against the criteria of each user in the database. If it matches, then the user is authenticated. If not, the network connection is denied. The following authentication methods are currently supported:
- RADIUS authentication.
- TACACS+ authentication.
- Local authentication.
Authorization
Authorization: For authenticated users, authorize which services they can use. For example, after logging into the system, the user may execute some commands to complete the corresponding operations. At this point, the authorization process checks whether the user has permission to execute these commands. In general, the authorization process is a combination of a number of coercion policies that determine the type or quality of activity, resources, or services that the user is allowed to use. The authorization process occurs in the context of authentication, and once a user is authenticated, they are granted the appropriate permissions as well. The following authorization methods are currently supported:
- RADIUS authorization.
- TACACS+ authorization.
- Local authorization.
Accounting Accounting: Records the resources consumed by users using network services during the connection process, such as connection time or the amount of transmissions and traffic sent and received by users during the connection process. The counting process can be performed based on statistical logs of the connection process, user information, authorization control, billing, trend analysis, resource utilization, and capacity planning activities. The following accounting methods are currently supported:
- TACACS+ accounting.
- Local accounting.
AAA Configuration
Section titled “AAA Configuration”Table 1 Overview of AAA Configuration Tasks
| Configuration Tasks | Description |
|---|---|
| Configure Authentication Mode | Optional |
| Configure Authorization Mode | Optional |
| Configure Accounting Mode | Optional |
| Configure RADIUS Server | Optional |
| Configure TACACS+ Server | Optional |
AAA Default Setting
Section titled “AAA Default Setting”The default setting of AAA is shown in the following table.
Table 2 AAA Default Setting
| Parameters | Default value |
|---|---|
| AAA authentication mode | local |
| AAA account mode | local |
| AAA authorization mode | local |
| Failthrough | disable |
| TACACS+ global/server auth_type | pap |
| TACACS+ global/server connection timeout time | 5s |
| TACACS+ global passkey | empty |
| TACACS+ server TCP port ID | 49 |
| TACACS+ server priority | 1 |
| TACACS+ server admin VRF | no vrf |
Configure Authentication Mode
Section titled “Configure Authentication Mode”Configure the authentication methods used for user authentication and the order in which each authentication method takes effect. To avoid authentication failures due to no response in single authentication method scenarios, local authentication is generally configured as the backup authentication method in the authentication scheme.
Table 3 Configure Authentication Mode
| Purpose | Command | Description |
|---|---|---|
| Enter global configuration view. | configure terminal | - |
| Configure AAA authentication mode. | aaa authentication-mode login{tacacs+| local|tacacs+,local|local,tacacs+|radius,local| local,radius|radius|default} | The default mode is local.Comma-separated modes indicate multi-level authentication. |
| Enable failthrough. | aaa authentication-mode failthrough {enable|disable|default} | This function is disabled by default.After this function is enabled, when performing multi-level authentication, if the first level of authentication fails, it will continue to perform the second level of authentication; otherwise, it will end directly. |
Configure Authorization Mode
Section titled “Configure Authorization Mode”Configure the authorization methods used for user authorization and the order in which each authorization method takes effect. The use of multiple authorization methods in an authorization scheme avoids authorization failures caused by the lack of response from a single authorization method. The authentication and authorization processes of RADIUS are converged and cannot be separated, and the authorization information is included in the authentication acceptance message responded by the server. Therefore, there is no need to configure the authorization mode when using RADIUS authentication.
Table 4 Configure Authorization Mode
| Purpose | Command | Description |
|---|---|---|
| Enter global configuration view. | configure terminal | - |
| Configure authorization mode | aaa authorization -mode{tacacs+|local|tacacs+,local|default} | The default mode is local. |
Configure Accounting Mode
Section titled “Configure Accounting Mode”Configure the accounting mode to be used for user accounting.
Table 5 Configure Accounting Mode
| Purpose | Command | Description |
|---|---|---|
| Enter global configuration view. | configure terminal | - |
| Configure account mode | aaa accounting-mode{tacacs+|local|tacacs+,local|default} | The default mode is local. |
Configure RADIUS Server
Section titled “Configure RADIUS Server”Table 6 Configure RADIUS Server
| Purpose | Command | Description |
|---|---|---|
| Enter global configuration view. | configure terminal | - |
| Add radius server | radius server ip_address [priority priority] shared-secret | Specify the RADIUS server IP. you can specify the server priority (range 1 to 64).After entering, enter the passkey |
Configure TACACS+ Server
Section titled “Configure TACACS+ Server”Table 6 TACACS+ Server Configuration
| Purpose | Command | Description |
|---|---|---|
| Enter global configuration view. | configure terminal | - |
| Add TACACS+ server. | tacacs-server ip_address [timeout interval ]* [auth_type {chap|pap|mschap|login}] [port tcp_port ]* [pri priority] [use-mgmt-vrf] [cipher cipher-secret |key] | ip_address: tacacs+ server IP address.interval :timeout interval(s), range 1 to 60, default is 5.key: passkey.auth_type : authentication type, default is “pap”.tcp_port: TCP port ID, range is 1-65535, default is 49.priority : the default value is 1use-mgmt-vrf: manage vrf, default is “no vrf”.If you enter key, enter the passkey after the command is finished |
| Configure TACACS+ global authtype. | tacacs-server authtype [chap|pap|mschap|login] | - |
| Configure TACACS+ global key. | tacacs-server passkey | Enter the passkey after the command is completed |
| Configure TACACS+ global timeout. | tacacs-server timeout interval | interval : timeout interval(s), range 1 to 60, default is 5 |
| Restore to default configuration. | tacacs-server default {authtype|passkey|timeout} | - |
Display and Maintenance
Section titled “Display and Maintenance”Table 7 Display and Maintenance
| Purpose | Command | Description |
|---|---|---|
| Show AAA configuration | show aaa | - |
| Show tacacs+ configuration | show tacacs | - |
| Show radius configuration | show radius | - |
Typical Configuration Examples
Section titled “Typical Configuration Examples”Example for Configuring Radius Authentication for SSH login users****1. Networking Requirements A RADIUS server is deployed in the network as shown in the figure below, and the enterprise wants the administrator to use RADIUS authentication to log in to the switch via SSH to manage the switch remotely.The specific requirements are as follows: The administrator must enter the correct username and password to log in to the switch via SSH. After logging in to the switch via SSH, the administrator can execute all commands at level 0 to 15. 2. Topology
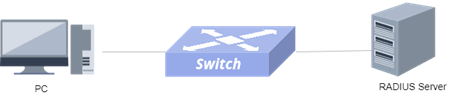
- Procedure
RADIUS Server:
#Install freeradius
#Edit the /etc/freeradius/clients.conf to configure the client passkey ,IP
client 10.250.0.0/24 { secret = radkey shortname = test}#Edit the /etc/freeradius/users to configure the username and password used by the client to log in
"user" Cleartext-Password := "admin" Reply-Message = "Hello, %{User-Name}", Management-Privilege-Level = 15#Turn on freeradius service
sudo freeradius -X```** Switch **\#Configure the authentication method
```plaintextsonic# configure terminalsonic(config)# aaa authentication-mode login radius,local
#If multiple authentication methods or multiple servers are configured, the failthrough needs to be enabled.
sonic(config)# aaa authentication-mode failthrough enable#Configure the radius server
sonic# configure terminalsonic(config)#radius server 10.250.0.243 shared-secret#Enter the passkey of the radius authentication server after the command is completed, which needs to be consistent with the configuration on the radius server 4. Verify the configuration. #Client login via ssh remotely.
ssh user@10.250.0.206Connecting to 10.250.0.206:22...Connection established.To escape to local shell, press Ctrl+Alt+].WARNING! The remote SSH server rejected X11 forwarding request.Linux sonic 4.9.0-14-2-amd64 #1 SMP Debian 4.9.246-2 (2020-12-17) x86_64 _ _ _ _ ___ ____ / \ ___ | |_ ___ _ __ | \ | | / _ \ / ___| / _ \ / __|| __| / _ \| '__|| \| || | | |___ \ / ___ \ __ \| |_ | __/| | | |\ || |_| | ___) |/_/ _\|___/ __| ___||_| |_| _| ___/ |____/
------- Asterfusion Network Operating System -------Help: http://www.asterfusion.com/user@sonic:-$```****Example for Configuring Tacacs+ Authentication for SSH login users
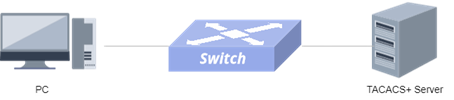
1. Networking Requirements A Tacacs+server is deployed in the network as shown in the figure below, and the enterprise wants the administrator to use Tacacs+authentication to log in to the switch via SSH to manage the switch remotely.The specific requirements are as follows: The administrator must enter the correct username and password to log in to the switch via SSH. After logging in to the switch via SSH, the administrator can execute all commands at level 0 to 15.2. Topology
3. Procedure** TACACS+ Server **\#Install tacacs+Edit the /etc/tacacs+/tac_plus.conf to configure the client passkey ,the username and password used by the client to log in
```bashkey = "testkey123"user = su1{login = cleartext "su1"pap = cleartext "su1"member = remote_user_su}#Restart tacacs+service
systemctl stop tacacs_plus.servicesudo tac_plus -C /etc/tacacs+/tac_plus.conf -G -g -d 512```** Switch **\#Configure the authentication method
```plaintextsonic# configure terminalsonic(config)# aaa authentication-mode login tacacs+/tacacs+,local/local,tacacs+
#If multiple authentication methods or multiple servers are configured, the failthrough needs to be enabled.
sonic(config)# aaa authentication-mode failthrough enable#Configure the Tacacs+server
sonic# configure terminalsonic(config)#tacacs+ server 10.250.0.243 timeout 30 key auth-type papEnter the passkey of the Tacacs+ authentication server after the command is completed, which needs to be consistent with the configuration on the Tacacs+ server.
- Verify the configuration.
#Client login via ssh remotely.
ssh su1@10.250.0.206Connecting to 10.250.0.206:22...Connection established.To escape to local shell, press Ctrl+Alt+].WARNING! The remote SSH server rejected X11 forwarding request.Linux sonic 4.9.0-14-2-amd64 #1 SMP Debian 4.9.246-2 (2020-12-17) x86_64    _          _                _   _   ___   ____   / \    ___ | |_   ___  _ __ | \ | | / _ \ / ___|  / _ \  / __|| __| / _ \| '__||  \| || | | |___ \ / ___ \ __ \| |_ |  __/| |   | |\  || |_| | ___) |/_/   _\|___/ __| ___||_|   |_| _| ___/ |____/
------- Asterfusion Network Operating System -------Help:    http://www.asterfusion.com/su1@sonic:-$
Management VRF
Section titled “Management VRF”Introduction
Section titled “Introduction”By separating service port traffic from management port traffic, the security of the management network can be improved.
Configure Management VRF
Section titled “Configure Management VRF”Table 8 Configrue Management VRF
| Purpose | Commands | Description |
|---|---|---|
| Enter global configuration view. | configure terminal | - |
| Enter the management port configuration view. | interface mgmt 0 | - |
| Configure the management port VRF. | vrf mgmt | - |
Display and Maintenance
Section titled “Display and Maintenance”Table 9 Management VRF Display and Maintenance
| Purpose | Commands | Description |
|---|---|---|
| Display the management interface IP and gateway. | show interface mgmt | - |
| Display the management VRF | show interface mgmt vrf | - |
Storm Control
Section titled “Storm Control”Introduction
Section titled “Introduction”Storm Control, the storm suppression function, should be configured on the traffic ingress. After broadcast/unknown-unicast/multicast storm suppression is configured on the interface, when the corresponding traffic on the interface exceeds the threshold set by the user, the system will automatically drop the messages that exceed the traffic limit, preventing BUM messages from affecting normal network service traffic forwarding.
Configure Storm Control
Section titled “Configure Storm Control”- Currently Storm Control only supports configuration on physical interfaces.
- When the interface needs to modify the parameters of Storm Control, you do not need to delete the previous configuration, and the repeated configuration will automatically overwrite the previous operation.
- You can set the speed limit in Bps (Bytes per second) or pps (packets per second). The actual speed limit in packets may not be accurate due to different chip implementations. For example, some chips implement speed limits in packets by using a fixed message length that translates into a speed limit in bytes, in which case the suppression threshold configured on the port may not be consistent with the actual effective suppression threshold.
Table 10 Configure Storm Control Profile
| Purpose | Commands | Description |
|---|---|---|
| Enter global configuration view. | configure terminal | - |
| Enter interface configuration view. | interface ethernet interface-number | - |
| Configure a storm suppression policy. | storm-suppress {unknown-unicast|broadcast|multicast} {bytes|packets} limit_value [cbs cbs_value] | limit_value specify the rate-limit value, which ranges from 7812 - 300000000000 bit/sec in bytes mode and 61 - 2343750000 pkts/sec pkts/sec in packets mode. cbs_value specify the Committed Burst Size, which is the amount of committed burst traffic that can pass instantaneously. The range of values is 1 - 1518500249 bytes in bytes mode and 1 - 11863283 packets in packets mode. |
Display and Maintenance
Section titled “Display and Maintenance”Table 11 Display and Maintenance
| Purpose | Commands | Description |
|---|---|---|
| Display the configuration for storm suppression. | show storm-suppress | - |