
ZTP Volume Configuration
Preface
Section titled “Preface”This document describes how to use the ZTP (Zero Touch Provisioning) feature to deploy Asterfusion data center switches in batches. After reading this document, you will be able to:
- Understand the trigger conditions, workflow, and task execution order of ZTP.
- Master the plugins supported by ZTP and how to configure their parameters.
- Use a DHCP server, a TFTP server, and a ZTP task configuration file to complete typical deployment scenarios such as batch configuration loading, system image upgrade, and connectivity check.
Basic Linux command line skills and networking knowledge are recommended before reading this document.
Introduction
Section titled “Introduction”When a newly deployed switch is powered on for the first time, it can complete configuration automatically without any user intervention. This framework is called Zero Touch Provisioning (ZTP). ZTP is a technology that automatically loads files (including software images, configuration files, patches, and custom files) onto factory-shipped switches. In a large data center, users can use ZTP together with generic configuration templates to deploy groups of switches in batches, improving deployment efficiency and reducing labor costs. The ZTP capabilities are summarized in the following table.
| Category | Value |
|---|---|
| Network mode | Out-of-band management deployment |
| IP protocol | ZTP over DHCPv4 |
| ZTP over DHCPv6 | |
| Main functions | Upgrade image |
| Install configuration | |
| Execute user defined script | |
| Check host connectivity |
Principle Description
Section titled “Principle Description”After the switch is powered on, it automatically enters the ZTP process. ZTP first checks the device configuration file (config_db.json): if the configuration file does not exist, or exists but is identical to the factory default configuration, ZTP starts automatically; if the configuration file exists and differs from the factory default configuration, ZTP does not start and the ZTP service exits automatically. The ZTP process is as follows:
- The switch sends a DHCP request on the management port.
- The DHCP server returns the TFTP server address and the path of the ZTP task configuration file through the DHCP Option fields: Option 66 (tftp-server-name) specifies the TFTP server, and Option 67 (bootfile-name) specifies the ZTP task configuration file.
- The switch downloads the ZTP task configuration file from the TFTP server according to the Option information in the received DHCP packet.
- The actions such as configuration loading, image upgrade, and script execution are performed in the order of the task object names. The ZTP task configuration file is in JSON format. A ZTP JSON file usually defines several configuration sections, which are also called ZTP objects. The following example contains three sections: 01-configdb-json, 02-firmware, and 03-connectivity-check.
{ "ztp":{ "01-configdb-json":{ }, "02-firmware":{ }, "03-connectivity-check":{ } }}Explanation:
- To enforce the execution order, name each ZTP object in the xx-name format (for example, 01-configdb-json). ZTP executes the objects in lexicographical order of their names.
ZTP Plugins
Section titled “ZTP Plugins”Each section of the ZTP JSON data is processed by a corresponding handler, which can be understood as using predefined logic to process the ZTP object or value. Such a handler is called a plugin. The support status of ZTP plugins is described below.
Available Plugins
Section titled “Available Plugins”The task plugins currently supported by ZTP are listed in the following table.
| Plugin | Description | Parameters and Description | Sub-parameters and Description |
|---|---|---|---|
| snmp | The snmp plugin is used to configure community fields on switch. | community-ro: SNMP community ro field | |
| snmp-location: SNMP location field | |||
| restart-agent: Restart snmp-agent after the configuration is complete. The value can be true or false. The default value is false. | |||
| configdb-json | The configdb-json plugin is used to download the config_db.json file and apply the configuration. Applying the configuration file triggers a configuration reloading, and the service processes on the device are restarted. | dynamic-url /url: Path from which config_db.json is obtained | |
| clear-config: Configures whether to clear the configuration when the config_db.json file already exists. If set to true, the configuration is cleared and a config reload is performed, after which the configuration file is downloaded and loaded; if set to false, the configuration file is downloaded and loaded directly. The default value is true. | |||
| save-config: Configures whether to save the configuration after the configuration is loaded. The default value is true. | |||
| firmware | The firmware plugin is used to install and remove system images and to update Docker images. | install: Install a system image | dynamic-url/url: URL of the system image |
| version: Specify the system version to be installed | |||
| set-default: Set the installed system image as the default boot image. The default value is true. | |||
| set-next-boot: Set the installed system image as the next boot image. The default value is false. | |||
| skip-reboot: Skip the reboot after the system image is installed. The default value is false. | |||
| pre-check: An executable script or file. If it returns a non-zero value, the plugin task is not executed. | |||
| remove: Remove an image | version: Specify the version to be removed | ||
| pre-check: An executable script or file. If it returns a non-zero value, the plugin task is not executed. | |||
| upgrade-docker: Update a Docker image | pre-check: An executable script or file. If it returns a non-zero value, the plugin task is not executed. | ||
| dynamic-url /url: URL of the Docker image | |||
| container-name: Name of the container to be updated, for example swss | |||
| cleanup-image: Remove the original image after the new image is installed. The default value is false. | |||
| tag: Configure a tag for the new image | |||
| user-script | The user-script plugin is used to execute a user-defined shell script. | dynamic-url /url: Path from which the user shell script is obtained | |
| connectivity-check | The connectivity-check plugin is used to check the connectivity between the switch and specified hosts. | ping-hosts: List of IPv4 hosts whose connectivity the user needs to check | |
| ping6-hosts: List of IPv6 hosts whose connectivity the user needs to check | |||
| ping-count: Number of ICMP request packets to be sent. The default value is 3. | |||
| retry-interval: Retry interval when a host cannot be pinged, The unit is seconds, and the default value is 5 seconds | |||
| retry-count: Number of retries when a host cannot be pinged, and the default value is 12 |
The url and dynamic-url parameters used by the preceding plugins are described in the following table.
| Name | Parameters and Description | Sub-parameters and Description |
|---|---|---|
| url | source: Download path of the file | |
| destination: Destination path of the file after it is downloaded locally | ||
| timeout: Maximum time to attempt the URL connection | ||
| dynamic-url | source: Download path of the file | prefix: Leading part of the url |
| identifier: Part that changes dynamically at runtime and identifies the switch characteristics. Available identifiers: serial-number, product-name, sonic-version | ||
| suffix: Trailing part of the url | ||
| destination: Destination path of the file after it is downloaded locally | ||
| timeout: Maximum time to attempt the URL connection |
Common Objects
Section titled “Common Objects”The common parameters supported by the preceding plugins are listed in the following table.
| Object | Value | Description |
|---|---|---|
| ignore-result | true or false | Ignore the result. Whether the result is SUCCESS or FAILED, it is marked as SUCCESS. The default value is false. |
| reboot-on-success | true or false | Reboot the switch when the task is executed successfully. The default value is false. |
| reboot-on-failure | true or false | Reboot the switch when the task fails to be executed. The default value is false. |
| halt-on-failure | true or false | Exit the ZTP process when the task fails. The default value is false. |
| restart-ztp-on-failure | true or false | Restart the ZTP process when the final ZTP result is FAILED after the task is executed. The default value is false. |
| restart-ztp-no-config | true or false | Restart ZTP when the config_db.json file does not exist after the task is executed. The default value is true. |
| config-fallback | true or false | Create the config_db.json file from the default template when the file does not exist after the task is executed. The default value is false. When this parameter is false, whether to restart the ZTP service is determined by the restart-ztp-no-config configuration. |
ZTP Configuration
Section titled “ZTP Configuration”The ZTP feature is enabled by default on the switch. With the factory default configuration, the switch automatically enters the ZTP process after it is powered on.
Disabling ZTP
Section titled “Disabling ZTP”The device supports the ability to disable the ZTP feature through the following two scenarios. Scenario 1: Exit without obtaining the configuration file (DHCP discovery phase) If there is no DHCP server on site or the server is unreachable, simply modifying any configuration and saving it will trigger ZTP to automatically exit:
| Operation | Command | Description |
|---|---|---|
| Modify the switch configuration and save it | write |
Explanation:
- After saving the configuration, the contents of /etc/sonic/config_db.json will no longer match the factory default configuration. The system will automatically exit the ZTP service upon detecting the configuration change. However, if the device has already downloaded and is currently executing a ZTP JSON task, manually saving the configuration will not terminate the task. Scenario 2: Actively closing using a command (at any stage)
The command can be directly executed to stop and disable ZTP:
| Operation | Command | Description |
|---|---|---|
| Enter the Bash CLI | system bash | |
| Disable ZTP | sudo config ztp disable -y | |
| Exit the Bash CLI | exit |
Explanation:
- When using the ZTP disable command to actively shut down ZTP, the switch will perform a reload operation. This is because ZTP may be in any stage at the time of shutdown, such as having already downloaded config_db.json from the server and loaded it onto the switch. Therefore, a reload operation is required to restore the system state.
Run show ztp status command to check the status. ZTP Admin Mode changes to False.
admin@sonic:~$ sudo config ztp disable -yActive ZTP session will be stopped and disabled, continue? [y/N]: yRunning command: ztp disable -yadmin@sonic:~$ show ztp statusZTP Admin Mode : FalseZTP Service    : InactiveZTP Status     : Not Started
ZTP Service is not running
admin@sonic:~$
Enabling ZTP
Section titled “Enabling ZTP”If ZTP has been disabled and you need to enable it manually, there are also two methods, and either one can be used. Method 1 restores the switch to the factory default configuration and then reboots the device; ZTP detects that the configuration is the factory default configuration and enters the ZTP process automatically. Method 2 renames config_db.json and then starts the ZTP process, regardless of whether the switch configuration is the factory default configuration.
Method 1
| Operation | Command | Description |
|---|---|---|
| Restore the default configuration | delete startup-config | The management port configuration is not preserved when the default configuration is restored |
| Reboot the switch | reboot |
Method 2
| Operation | Command | Description |
|---|---|---|
| Enter the Bash CLI | system bash | |
| Enable ZTP | sudo config ztp enable | |
| Start the ZTP service | sudo ztp run -y | |
| Exit the Bash CLI | exit |
Explanation:
- When restoring the default configuration, if you need to preserve the management port IP, run the delete startup-config reserve-mgmt command. In this case, ZTP is not triggered after the switch reboots.
Display and Maintenance
Section titled “Display and Maintenance”| Operation | Command | Description |
|---|---|---|
| Enter the Bash CLI | system bash | |
| Display ZTP status | show ztp status | Displays the ZTP service status and the execution result of each task |
| Display the status of all ZTP tasks | show ztp status —verbose | Displays the ZTP service status, task source, running duration, and the detailed status of each task |
The following is a sample output of show ztp status —verbose.
admin@sonic:~$ show ztp status --verboseCommand: ztp status --verbose========================================ZTP========================================ZTP Admin Mode : TrueZTP Service    : InactiveZTP Status     : SUCCESSZTP Source     : dhcp-opt67 (eth0)Runtime        : 16m 45sTimestamp      : 2026-09-11 09:31:37 UTCZTP JSON Version : 1.0
ZTP Service is not running
----------------------------------------01-firmware----------------------------------------Status          : SUCCESSRuntime         : 13m 26sTimestamp       : 2026-09-11 09:30:37 UTCIgnore Result   : False
----------------------------------------02-configdb-json----------------------------------------Status          : SUCCESSRuntime         : 46sTimestamp       : 2026-09-11 09:31:23 UTCIgnore Result   : False
----------------------------------------03-connectivity-check----------------------------------------Status          : SUCCESSRuntime         : 14sTimestamp       : 2026-09-11 09:31:37 UTCIgnore Result   : False
The fields in the preceding output are described in the following table.
| Field | Value | Description |
|---|---|---|
| ZTP Admin Mode | True/False | ZTP administrative switch, controlled by config ztp enable / disable. |
| ZTP Service | Inactive/Active Discovery | ZTP service running status. Active Discovery indicates that the service is running and is in the DHCP discovery phase. |
| ZTP Status | Not Started/IN-PROGRESS/SUCCESS/FAILED | Overall execution status of the ZTP tasks. |
| ZTP Source | dhcp-opt67 (eth0), etc. | Source of the ZTP task configuration file. The interface used is shown in parentheses. eth0 indicates the management port. |
| Runtime | Duration for which the ZTP process has been running. | |
| Timestamp | Time when the status was last updated. | |
| ZTP JSON Version | 1.0 | Version of the ZTP task configuration file. |
Configuration Examples
Section titled “Configuration Examples”Batch Configuration Loading and Software Upgrade Through ZTP
Section titled “Batch Configuration Loading and Software Upgrade Through ZTP”Requirements
The administrator needs to upgrade the software image of several newly deployed switches in a site equipment room, load the prepared configuration files, and automatically check the connectivity from the switch management port to the gateway after batch deployment is complete.
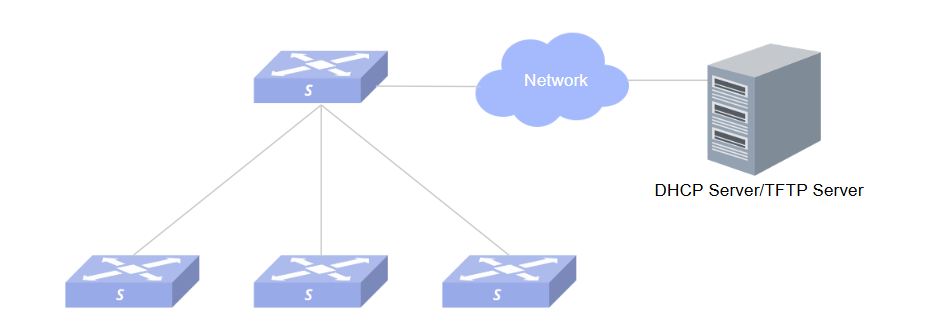
Network Topology
Configuration Approach
(1) Set up DHCP and TFTP servers on the server. For deployment instructions, see the appendix. In the DHCP server configuration, specify the TFTP server address and the ZTP JSON configuration file required by the switch to run ZTP. In the TFTP server configuration file, specify the working directory of the TFTP server, and place the ZTP JSON configuration file in this working directory. (2) Prepare the image files and the configuration file of each switch, deploy them to the server, and then specify the paths of the image file and the configuration file in the ZTP JSON file. (3) Write the ZTP task configuration file, including upgrading the image, loading the configuration, and checking the connectivity from the switch management port to the gateway. (4) Power on the switches to be deployed that have an empty configuration. After they are powered on, ZTP runs automatically and executes the ZTP configuration tasks.
Configuration Procedure
(1) Create directories on the server, and place the prepared image files and config_db.json configuration files in the corresponding directories.
sonic@asterfusion:~$ mkdir -p /sonic-install/sonic_imagessonic@asterfusion:~$ mkdir -p /sonic-install/sonic_cfgsonic@asterfusion:~$ cd /sonic-install/sonic_imagessonic@asterfusion:/sonic-install/sonic_images$ lsCX308P-48Y-NF.bin CX532P-NT.bin CX532P-NT_R0407P00.bin sonic-marvell.binsonic@asterfusion:/sonic-install/sonic_images$ cd ../sonic_cfgsonic@asterfusion:/sonic-install/sonic_cfg$ lsF022235A076.json F023529A054.json F023529A054.sh(2) If the switch models to be configured differ, different software images may need to be installed. You can distinguish them by product name so that the switch model corresponds to the image file. If you want to deliver different configurations to different switches, you can uniquely identify the configuration of a switch by serial number so that the switch corresponds to the configuration file. Specifically, name the image file in the Product_Name.bin format and rename config_db.json in the Serial_Number.json format.
- Product Name and Serial Number information can be obtained from the label on the top of the switch or by logging in to the switch through the console port and running the show platform sys-eeprom command.
(3) In the following example, the Product Name of the switch is CX532P-NT and the Serial Number is F023529A054. (4) Create a ztp.json file in the /sonic-install directory on the server. This is the ZTP configuration file, and its content is as follows:
{ "ztp": { "01-firmware": { "install": { "dynamic-url": { "source": { "prefix": "tftp://10.250.0.243/sonic_images/", "identifier": "product-name", "suffix": ".bin" } }, "set-default": true, "set-next-boot": true, } }, "02-configdb-json": { "dynamic-url": { "source": { "prefix": "tftp://10.250.0.243/sonic_cfg/", "identifier": "serial-number", "suffix": ".json" } }, "save-config": true }, "03-connectivity-check": { "ping-hosts": ["10.250.0.254"] } }}(5) Power on the switch and wait for the ZTP task process to complete. You can run the show ztp status —verbose command on the switch to check the ZTP status and task completion.
Verification
Log in to the switch and check the result. If the switch image is upgraded successfully, the configuration is delivered correctly, and the status of all the preceding ZTP tasks is SUCCESS, the ZTP process has been executed successfully.
Appendix
Section titled “Appendix”Setting Up a DHCP Server
Section titled “Setting Up a DHCP Server”The following is an example of setting up a DHCP server in a Linux environment. Install the isc-dhcp-server service.
sudo apt install isc-dhcp-serverModify /etc/default/isc-dhcp-server to specify the NIC that listens for DHCP requests.
sudo vim /etc/default/isc-dhcp-serverThe modification is as follows. The NIC name of the server used in this example is eno1:
INTERFACES="eno1"Configure the IP address of the eno1 NIC as follows:
sudo ip addr add 10.250.0.243/24 dev eno1Modify /etc/dhcp/dhcpd.conf to configure the address pool to be allocated:subnet 10.250.0.0 netmask 255.255.255.0 { range 10.250.0.10 10.250.0.200; default-lease-time 6000; max-lease-time 72000; option subnet-mask 255.255.255.0; option routers 10.250.0.254; option domain-name-servers 114.114.114.114; option tftp-server-name "10.250.0.243"; option bootfile-name "ztp.json";}- In the preceding configuration example, the subnet must be on the same network segment as the eno1 NIC. option tftp-server-name is DHCP Option 66, which specifies the name of the TFTP server used. option bootfile-name is DHCP Option 67, which specifies the ZTP task configuration file used.
Restart the DHCP service and check its running status.
sudo service isc-dhcp-server restartsudo service isc-dhcp-server statusSetting Up a TFTP Server
Section titled “Setting Up a TFTP Server”The following is an example of setting up a TFTP server in a Linux environment. Install the tftpd-hpa service.
sudo apt-get install tftpd-hpaCreate a folder /sonic-install in the server root directory (/) and grant permissions on it.
cd /mkdir sonic-installchmod 777 sonic-installModify the TFTP configuration file /etc/default/tftpd-hpa to specify the TFTP working directory.
TFTP_USERNAME="tftp"TFTP_DIRECTORY="/sonic-install"TFTP_ADDRESS="0.0.0.0"TFTP_PORT="69"TFTP_OPTIONS="--secure --create"RUN_DAEMON="yes"Restart the TFTP service and check its running status.
sudo service tftpd-hpa restartsudo service tftpd-hpa status